By: Team W16-3 Since: Sep 2018 Licence: MIT
- 1. Setting Up
- 2. Design
- 3. Implementation
- 4. Documentation
- 5. Testing
- 6. Dev Ops
- Appendix A: Suggested Programming Tasks to Get Started
- Appendix B: Product Scope
- Appendix C: User Stories
- Appendix D: Use Cases
- Appendix E: Non Functional Requirements
- Appendix F: Glossary
- Appendix G: Product Survey
- Appendix H: Instructions for Manual Testing
1. Setting Up
1.1. Prerequisites
Listed below are the prerequites:
-
JDK
9or laterJDK 10on Windows will fail to run tests in headless mode due to a JavaFX bug. Windows developers are highly recommended to use JDK9. -
IntelliJ IDE
IntelliJ by default has Gradle and JavaFx plugins installed.
Do not disable them. If you have disabled them, go toFile>Settings>Pluginsto re-enable them.
1.2. Setting up the project in your computer
Listed below are the steps to set up the project:
-
Fork this repo, and clone the fork to your computer.
-
Open IntelliJ. (If you are not in the welcome screen, click
File>Close Projectto close the existing project dialog first.) -
Set up the correct JDK version for Gradle.
-
Click
Configure>Project Defaults>Project Structure. -
Click
New…and find the directory of the JDK.
-
-
Click
Import Project. -
Locate the
build.gradlefile and select it. ClickOK. -
Click
Open as Project. -
Click
OKto accept the default settings. -
Open a console and run the command
gradlew processResources(Mac/Linux:./gradlew processResources). It should finish with theBUILD SUCCESSFULmessage.
This will generate all resources required by the application and tests. -
Open
XmlAdaptedPerson.javaandMainWindow.javaand check for any code errors.-
Due to an ongoing issue with some of the newer versions of IntelliJ, code errors may be detected even if the project can be built and run successfully.
-
To resolve this, place your cursor over any of the code section highlighted in red. Press ALT+ENTER, and select
Add '--add-modules=…' to module compiler optionsfor each error.
-
-
Repeat this for the test folder as well. (E.g. check
XmlUtilTest.javaandHelpWindowTest.javafor code errors, and if so, resolve it the same way.)
1.3. Verifying the setup
Listed below are the steps to verify the setup:
-
Run the
seedu.address.MainAppand try a few commands. -
Run the tests to ensure they all pass.
1.4. Configurations to do before writing code
1.4.1. Configuring the coding style
This project follows oss-generic coding standards. IntelliJ’s default style is mostly compliant with ours but it uses a different import order from ours. To rectify, follow these steps:
-
Go to
File>Settings…(Windows/Linux), orIntelliJ IDEA>Preferences…(macOS). -
Select
Editor>Code Style>Java. -
Click on the
Importstab to set the order.-
For
Class count to use import with '*'andNames count to use static import with '*': Set to999to prevent IntelliJ from contracting the import statements. -
For
Import Layout: Change the import order toimport static all other imports,import java.*,import javax.*,import org.*,import com.*,import all other imports. Add a<blank line>between eachimport.Optionally, you can follow the UsingCheckstyle.adoc document to configure Intellij to check style-compliance as you write code.
-
1.4.2. Updating documentation to match your fork
After forking the repo, the documentation will still have the SE-EDU branding and refer to the se-edu/addressbook-level4 repo.
If you plan to develop this fork as a separate product (i.e. instead of contributing to se-edu/addressbook-level4), you should do the following:
-
Configure the site-wide documentation settings in
build.gradle, such as thesite-name, to suit your own project. -
Replace the URL in the attribute
repoURLinDeveloperGuide.adocandUserGuide.adocwith the URL of your fork.
1.4.3. Setting up CI
Set up Travis to perform Continuous Integration (CI) for your fork. See UsingTravis.adoc to learn how to set it up.
After setting up Travis, you can optionally set up coverage reporting for your team fork (see UsingCoveralls.adoc).
| Coverage reporting could be useful for a team repository that hosts the final version but it is not that useful for your personal fork. |
Optionally, you can set up AppVeyor as a second CI (see UsingAppVeyor.adoc).
| Having both Travis and AppVeyor ensures your App works on both Unix-based platforms and Windows-based platforms. (Travis is Unix-based and AppVeyor is Windows-based.) |
1.4.4. Getting started with coding
Listed below are some things to try when you are ready to start coding:
-
Get some sense of the overall design by reading Section 2.1, “Architecture”.
-
Take a look at Appendix A, Suggested Programming Tasks to Get Started.
2. Design
2.1. Architecture
The Architecture Diagram given below explains the high-level design of the App.

Given below is a quick overview of each component.
The .pptx files used to create diagrams in this document can be found in the diagrams folder. To update a diagram, modify the diagram in the pptx file, select the objects of the diagram, and choose Save as picture.
|
Main has only one class called MainApp. It is responsible for:
-
At app launch: Initializing the components in the correct sequence, and connecting them up with each other.
-
At shut down: Shutting down the components and invoking cleanup method where necessary.
Commons represents a collection of classes used by multiple other components. Two of those classes play important roles at the architecture level.
-
EventsCenter: This class (written using Google’s Event Bus library) is used by components to communicate with other components using events. (i.e. a form of Event Driven design) -
LogsCenter: This class is used by many classes to write log messages to the App’s log file.
The rest of the App consists of four components.
Each of the four components
-
Defines its API in an
interfacewith the same name as the Component. -
Exposes its functionality using a
{Component Name}Managerclass.
For example, the Logic component (see the class diagram given below) defines it’s API in the Logic.java interface and exposes its functionality using the LogicManager.java class.

Events-Driven nature of the design
The Sequence Diagram below shows how the components interact for the scenario where the user issues the command delete 1.

delete 1 Command (Part 1)
Note how the Model simply raises a AddressBookChangedEvent when the Address Book data are changed, instead of asking the Storage to save the updates to the hard disk.
|
The diagram below shows how the EventsCenter reacts to that event, which eventually results in the updates being saved to the hard disk and the status bar of the UI being updated to reflect the 'Last Updated' time.

delete 1 Command (Part 2)
Note how the event is propagated through the EventsCenter to the Storage and UI without Model having to be coupled to either of them. This is an example of how this Event Driven approach helps us reduce direct coupling between components.
|
The sections below give more details of each component.
2.2. UI component
Given below is the structure of the UI component.

UI ComponentAPI : Ui.java
As shown in the figure above, the UI consists of a MainWindow that is made up of parts e.g.CommandBox, ResultDisplay, PersonListPanel, StatusBarFooter, BrowserPanel etc. All these, including the MainWindow, inherit from the abstract UiPart class.
The UI component uses JavaFx UI framework. The layout of these UI parts are defined in matching .fxml files that are in the src/main/resources/view folder. For example, the layout of the MainWindow is specified in MainWindow.fxml
The UI component,
-
Executes user commands using the
Logiccomponent. -
Binds itself to some data in the
Modelso that the UI can auto-update when data in theModelchange. -
Responds to events raised from various parts of the App and updates the UI accordingly.
2.3. Logic component
Shown below is the structure of the Logic component.

API :
Logic.java
As shown in the figure above, Logic uses the AddressBookParser class to parse the user command. This results in a Command object which is executed by the LogicManager.
The command execution can affect the Model (e.g. adding a person) and/or raise events.
The result of the command execution is encapsulated as a CommandResult object which is passed back to the Ui.
Given below is the Sequence Diagram for interactions within the Logic component for the execute("delete 1") API call.
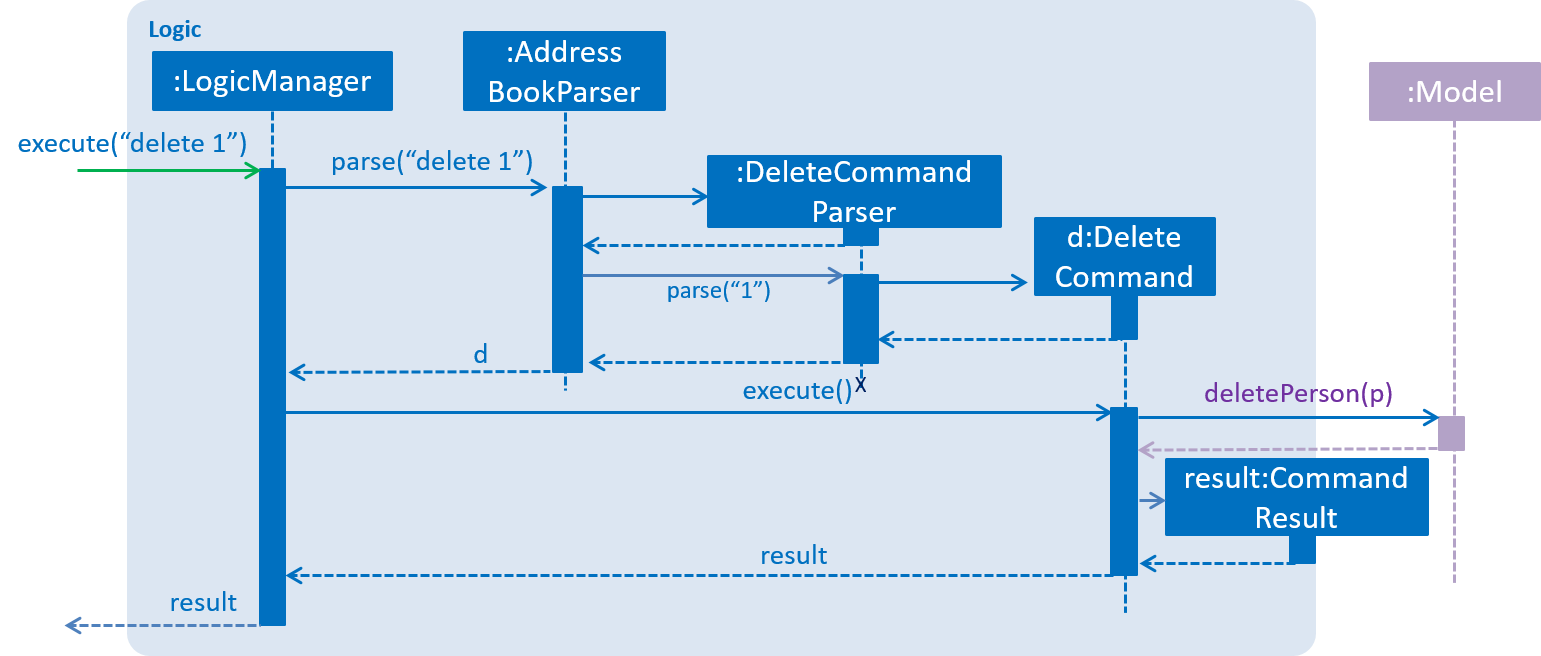
delete 1 Command2.4. Model component
Shown below is the structure of the Model component.

API : Model.java
As shown by the figure above, the Model,
-
stores a
UserPrefobject that represents the user’s preferences. -
stores the Address Book data.
-
exposes an unmodifiable
ObservableList<Person>that can be 'observed' e.g. the UI can be bound to this list so that the UI automatically updates when the data in the list change. -
does not depend on any of the other three components.
As a more OOP model, we can store a Tag list in Address Book, which Person can reference. This would allow Address Book to only require one Tag object per unique Tag, instead of each Person needing their own Tag object. An example of how such a model may look like is given below.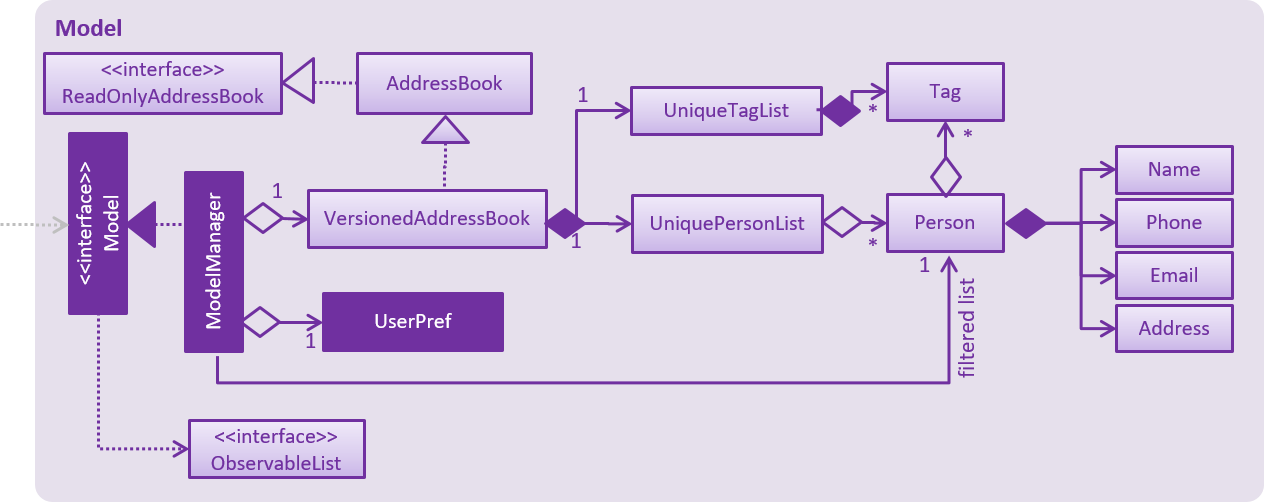
|
2.5. Storage component
Shown below is the structure of the Storage component.

API : Storage.java
As shown by the figure above, the Storage component,
-
can save
UserPrefobjects in json format and read it back. -
can save the Address Book data in xml format and read it back.
2.6. Common classes
Classes used by multiple components are in the seedu.addressbook.commons package.
3. Implementation
This section describes some noteworthy details on how certain features are implemented.
3.1. Undo/Redo feature
3.1.1. Current implementation
The undo/redo mechanism is facilitated by VersionedAddressBook.
It extends AddressBook with an undo/redo history, stored internally as an addressBookStateList and currentStatePointer.
Additionally, it implements the following operations:
-
VersionedAddressBook#commit()— Saves the current address book state in its history. -
VersionedAddressBook#undo()— Restores the previous address book state from its history. -
VersionedAddressBook#redo()— Restores a previously undone address book state from its history.
These operations are exposed in the Model interface as Model#commitAddressBook(), Model#undoAddressBook() and Model#redoAddressBook() respectively.
Given below is an example usage scenario and how the undo/redo mechanism behaves at each step.
Step 1. The user launches the application for the first time. The VersionedAddressBook will be initialized with the initial address book state, and the currentStatePointer pointing to that single address book state.

Step 2. The user executes delete 5 command to delete the 5th person in the address book. The delete command calls Model#commitAddressBook(), causing the modified state of the address book after the delete 5 command executes to be saved in the addressBookStateList, and the currentStatePointer is shifted to the newly inserted address book state.

Step 3. The user executes add n/David … to add a new person. The add command also calls Model#commitAddressBook(), causing another modified address book state to be saved into the addressBookStateList.

If a command fails its execution, it will not call Model#commitAddressBook(), so the address book state will not be saved into the addressBookStateList.
|
Step 4. The user now decides that adding the person was a mistake, and decides to undo that action by executing the undo command. The undo command will call Model#undoAddressBook(), which will shift the currentStatePointer once to the left, pointing it to the previous address book state, and restores the address book to that state.
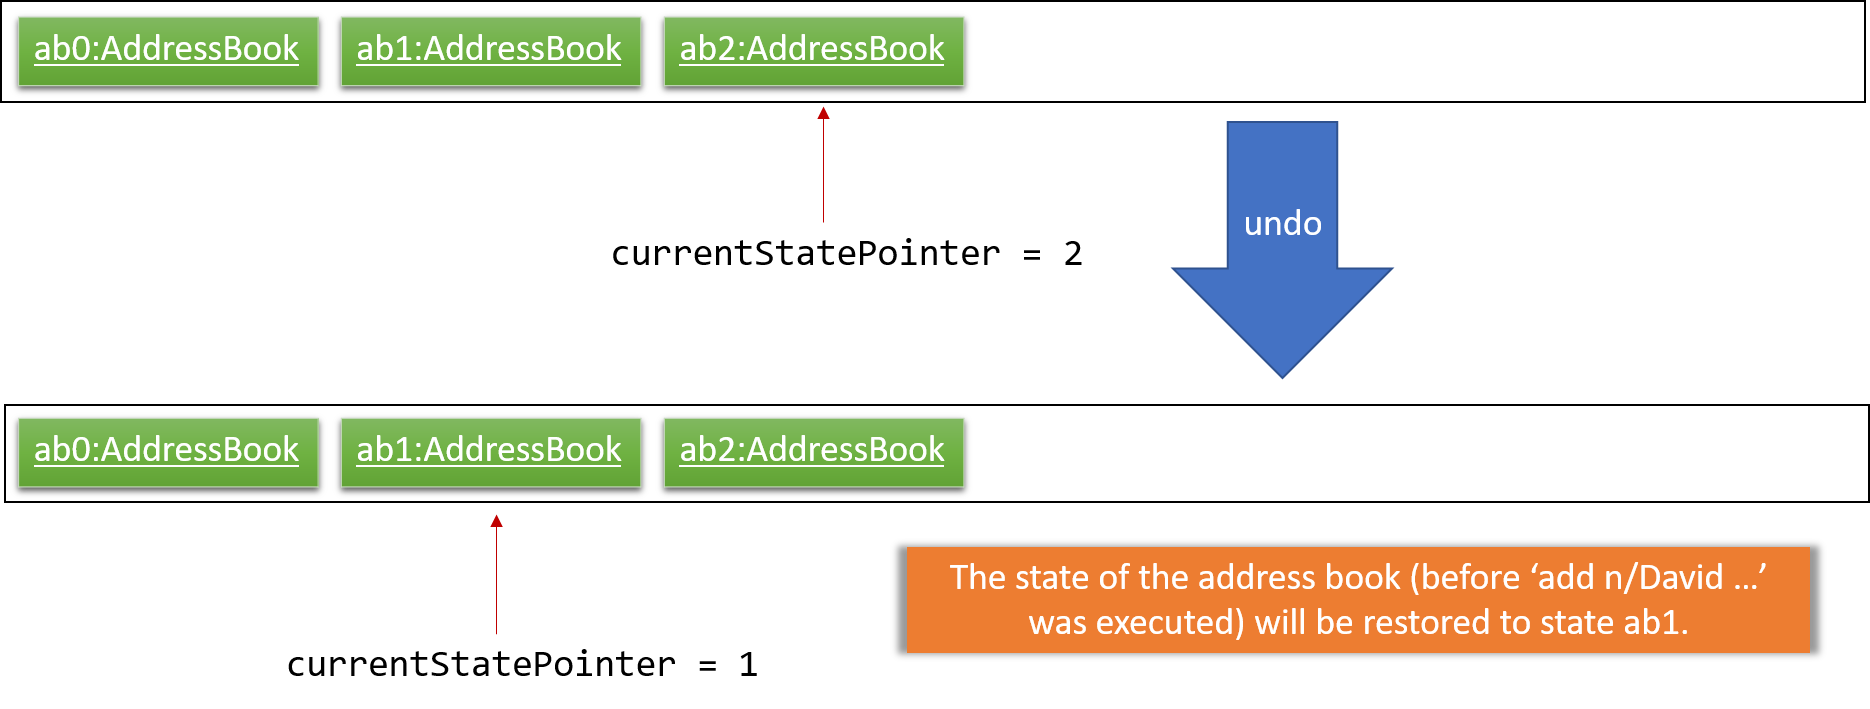
If the currentStatePointer is at index 0, pointing to the initial address book state, then there are no previous address book states to restore. The undo command uses Model#canUndoAddressBook() to check if this is the case. If so, it will return an error to the user rather than attempting to perform the undo.
|
The following sequence diagram shows how the undo operation works:
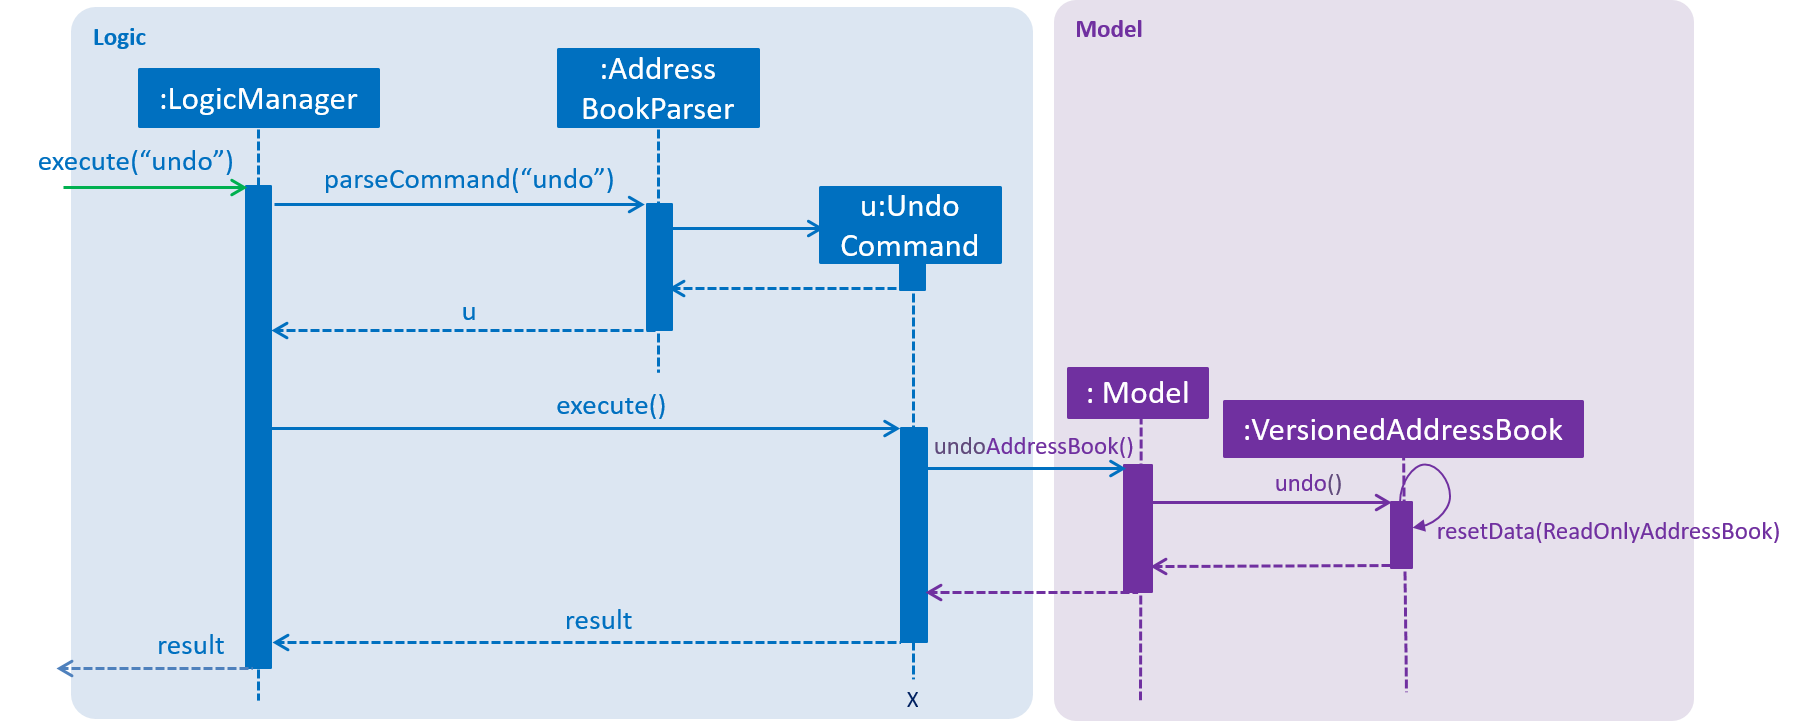
The redo command does the opposite — it calls Model#redoAddressBook(), which shifts the currentStatePointer once to the right, pointing to the previously undone state, and restores the address book to that state.
If the currentStatePointer is at index addressBookStateList.size() - 1, pointing to the latest address book state, then there are no undone address book states to restore. The redo command uses Model#canRedoAddressBook() to check if this is the case. If so, it will return an error to the user rather than attempting to perform the redo.
|
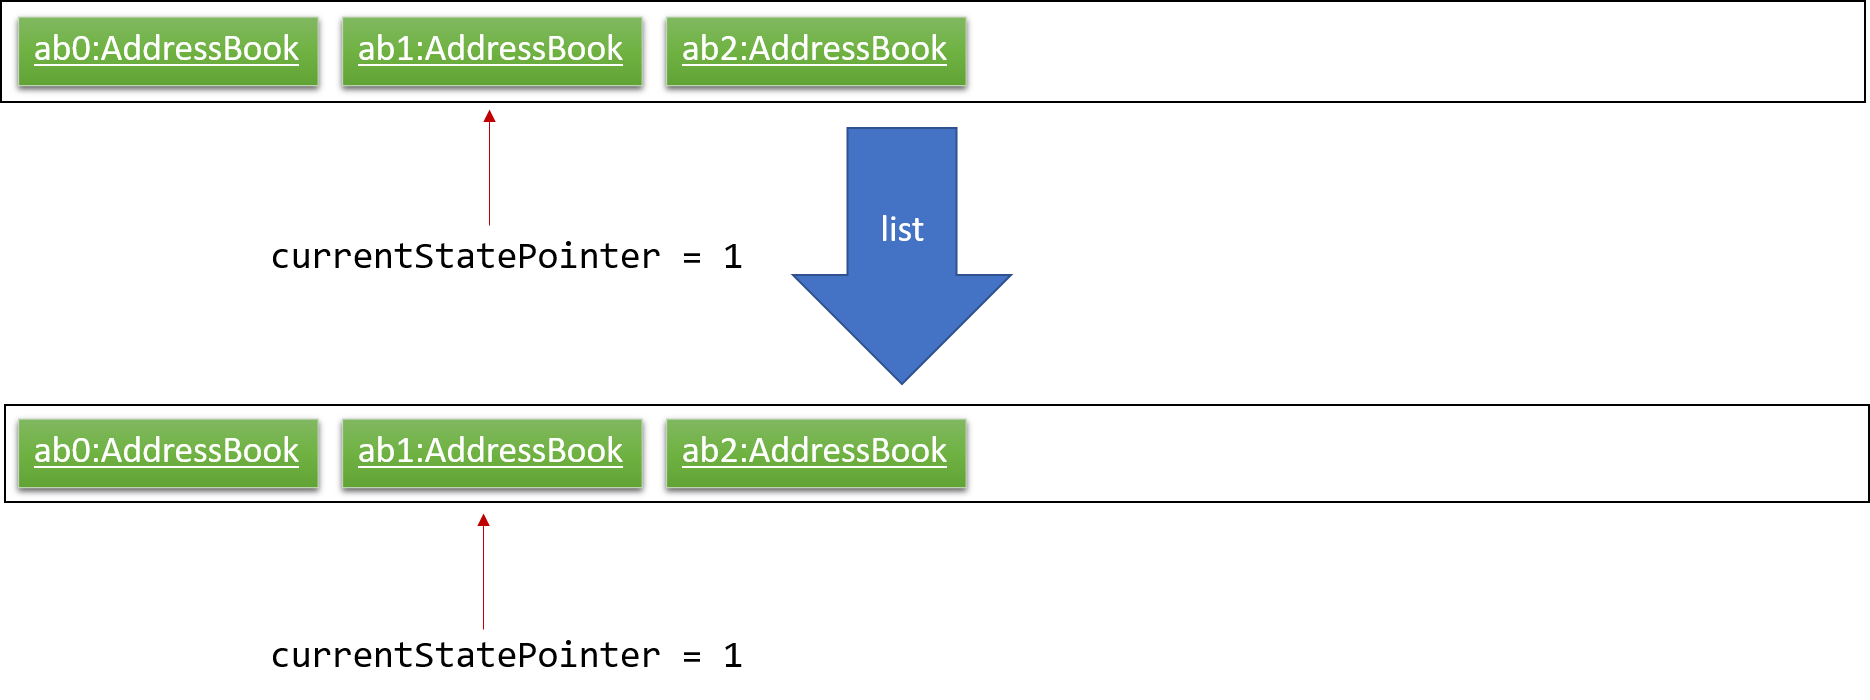
Step 5. The user then decides to execute the command list. Commands that do not modify the address book, such as list, will usually not call Model#commitAddressBook(), Model#undoAddressBook() or Model#redoAddressBook(). Thus, the addressBookStateList remains unchanged.
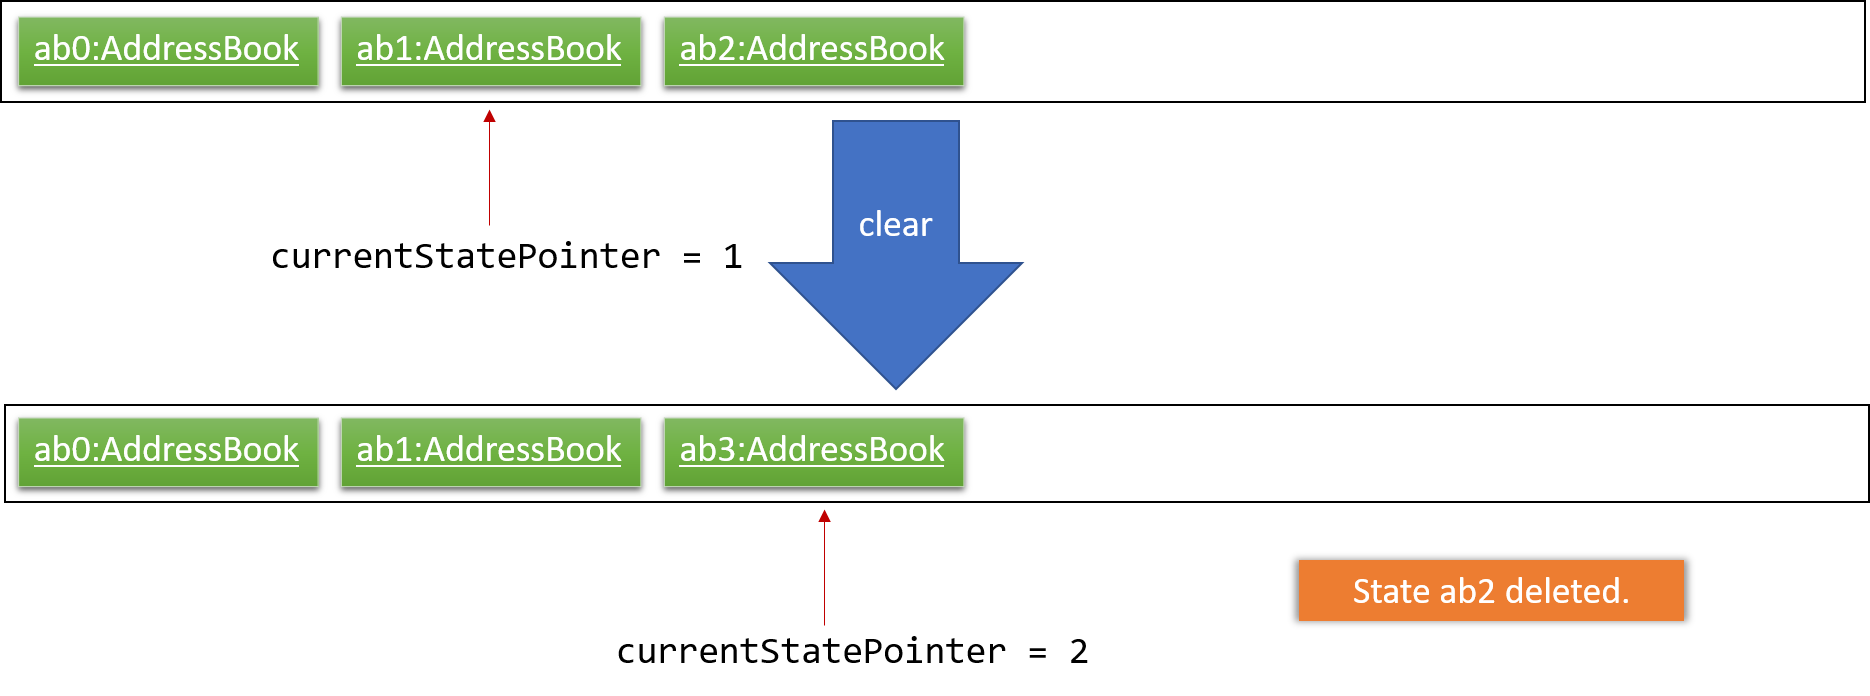
Step 6. The user executes clear, which calls Model#commitAddressBook(). Since the currentStatePointer is not pointing at the end of the addressBookStateList, all address book states after the currentStatePointer will be purged. We designed it this way because it no longer makes sense to redo the add n/David … command. This is the behavior that most modern desktop applications follow.
The following activity diagram summarizes what happens when a user executes a new command:

3.1.2. Design considerations
This section describes the pros and cons of the current and other alternate implementations of undo & redo.
Aspect: How undo & redo executes
-
Alternative 1 (current choice): Save the entire address book.
-
Pros: Easy to implement.
-
Cons: May have performance issues in terms of memory usage.
-
-
Alternative 2: Use individual commands to undo/redo by itself.
-
Pros: Will use less memory (e.g. for
delete, just save the person being deleted). -
Cons: Must ensure that the implementations of individual commands are correct.
-
Aspect: Data structure to support the undo/redo commands
-
Alternative 1 (current choice): Use a list to store the history of address book states.
-
Pros: Easy for new Computer Science student undergraduates to understand, who are likely to be the new incoming developers of our project.
-
Cons: Logic is duplicated twice. For example, when a new command is executed, we must remember to update both
HistoryManagerandVersionedAddressBook.
-
-
Alternative 2: Use
HistoryManagerfor undo/redo-
Pros: We do not need to maintain a separate list, and just reuse what is already in the codebase.
-
Cons: Requires dealing with commands that have already been undone: We must remember to skip these commands. Violates Single Responsibility Principle and Separation of Concerns as
HistoryManagernow needs to do two different things.
-
3.2. Schedule command feature
3.2.1. Current implementation
The scheduling appointment mechanism is facilitated by ScheduleCommandParser, ScheduleCommand, Appointment and AppointmentManager.
ScheduleCommand extends from Command and ScheduleCommandParser implements Parser.
The key operation implemented is ScheduleCommand#execute.
Given below is an example usage scenario and how the schedule command mechanism behaves at each step.
Step 1. The user wants to schedule an appointment. User proceeds to fill in the details behind the respective prefixes.
For example: schedule 1 d/23.11.2018 st/1300 et/1400 dn/Jack di/S1234567B pn/John Doe pi/S1234567A
Step 2. The user executes the ScheduleCommand which calls the ScheduleCommandParser.
ScheduleCommandParser will parse the inputs and return a ScheduleCommand.
Step 3. ScheduleCommand then executes.
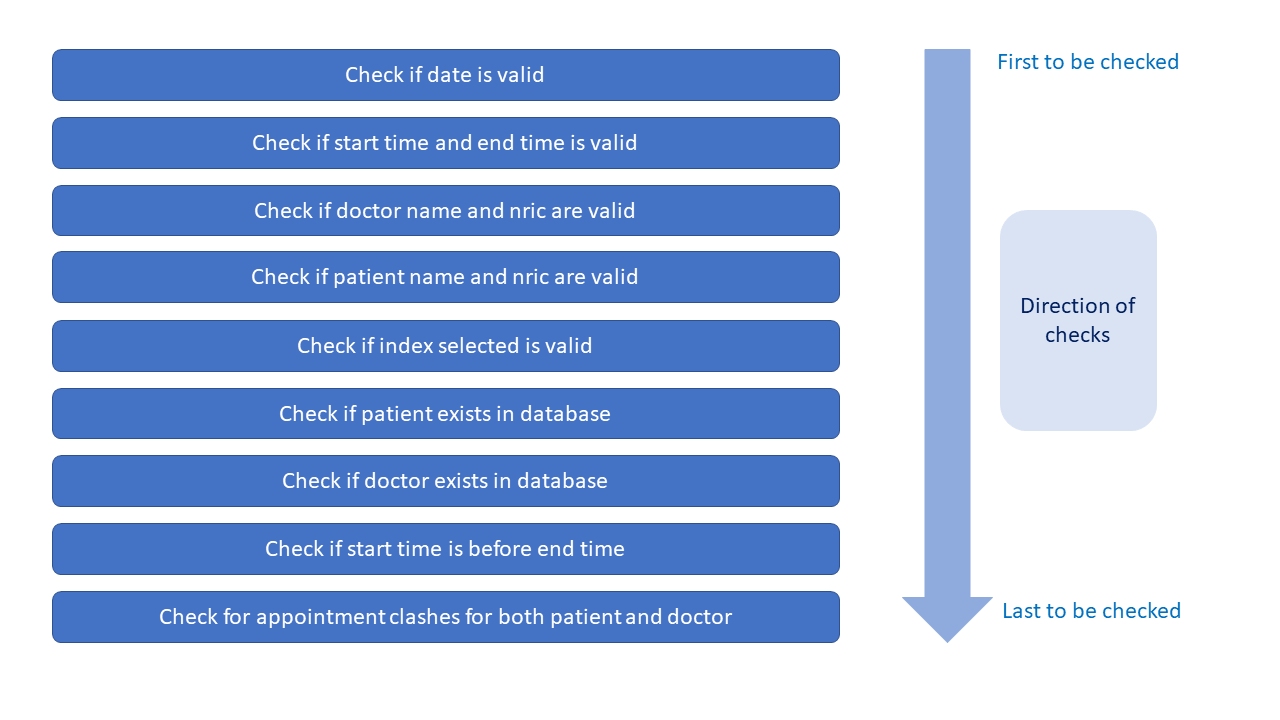
ScheduleCommand then conducts various checks sequentially to ensure that the appointment scheduled is valid.
If it is invalid, an exception message will be thrown.
The Appointment will not be scheduled.
The order of checks conducted is displayed in the image below.
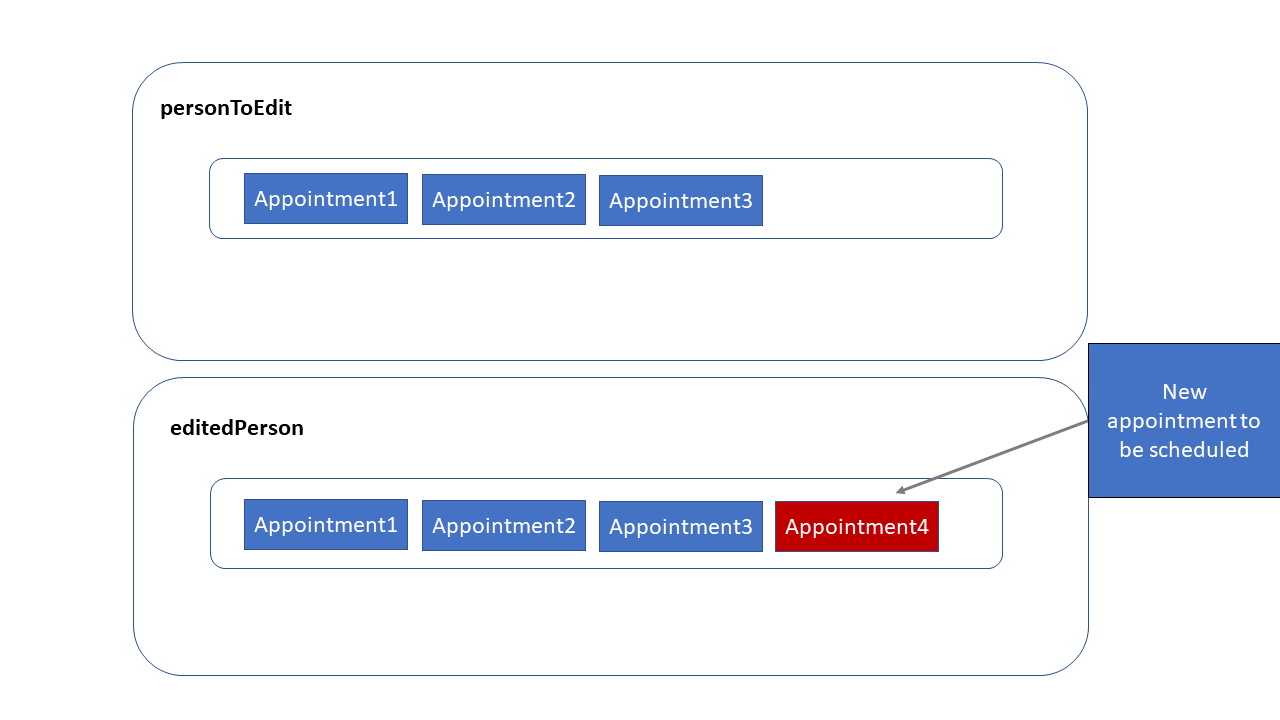
Step 4. A successful check gives 2 objects, personToEdit and Appointment object.
Program creates another Person object called editedPerson that is equal to personToEdit.
ScheduleCommand then adds Appointment to the appointmentList of editedPerson.
Lastly, ScheduleCommand replaces personToEdit with editedPerson in our model.
This is shown in the diagram below.
The above procedure in step 4 is then repeated for the other person (e.g. the other person is a doctor if the specified person is a patient) involved in the scheduling process.
Step 5. XmlAdaptedPerson updates storage of appointmentList.
The following sequence diagram shows how the schedule appointment operation works:
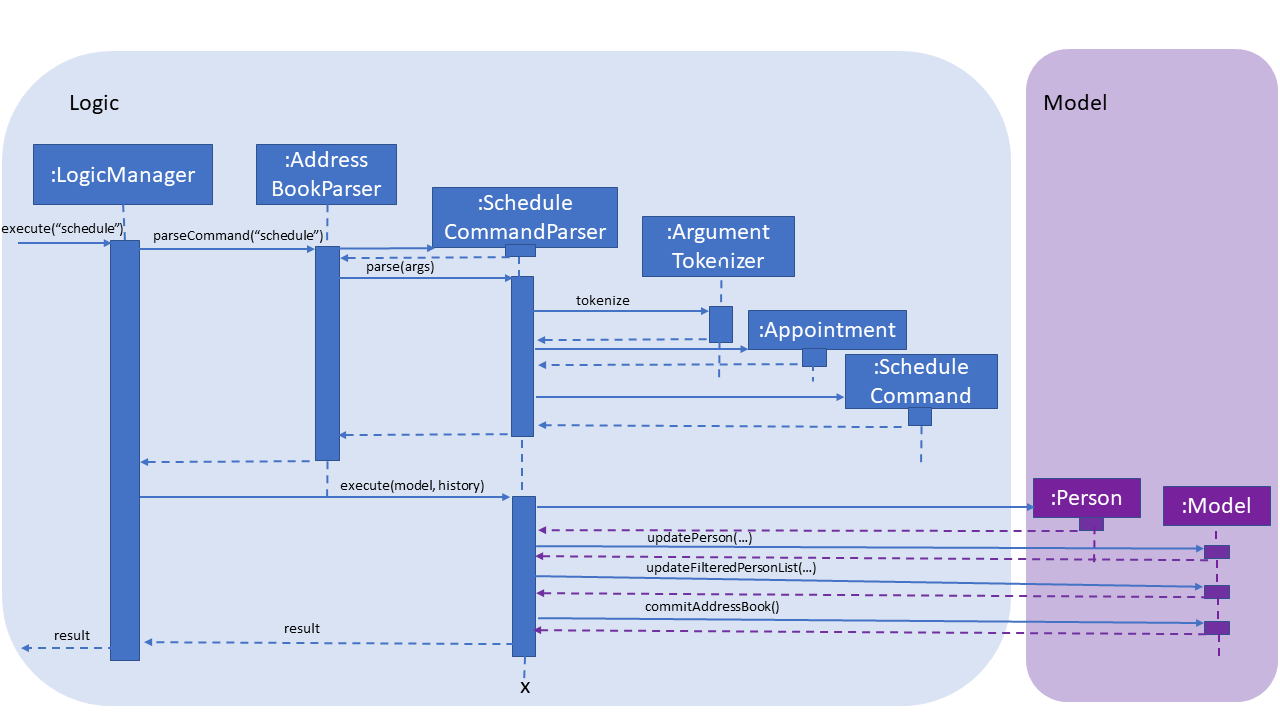
3.2.2. Design Considerations
This section describes the pros and cons of the current and other alternate implementations of schedule.
Aspect: Command for schedule command
-
Alternative 1 (current choice): Take in the inputs for schedule appointment command using one prefix for each detail. For example:
schedule 1 d/23.11.2018 st/1300 et/1400 dn/Jack di/S1234567B pn/John Doe pi/S1234567A-
Pros: The design is consistent with the other commands in the application.
-
Cons: It requires the user to type more when scheduling an appointment.
-
-
Alternative 2: Use a comma-separated long string in the command prompt to schedule an appointment. For example:
schedule 1 s/23.11.2018,1300,1400,Jack,S1234567B,John Doe,S1234567A-
Pros: The user has to type less when scheduling a command. The user is not required to type all the prefixes, he just has to type one prefix,
s/. -
Cons: The design would not be consistent with the other commands. This might confuse the user.
-
Aspect: Sorting of appointments
-
Alternative 1 (current choice): Do not sort the appointments in the ArrayList of appointments. A new appointment is added to the back of the ArrayList.
-
Pros: It is simple to check for appointment clashes. To check for appointment clashes, just loop through the ArrayList and check the new appointment against every other appointment. The simplicity is shown in code below.
public static boolean isClash(Appointment appointment, Appointment otherAppointment) { if (appointment.isClash(otherAppointment)) { return true; } return false; } -
Cons: It might not be the most efficient way.
-
-
Alternative 2: Sort the appointments in the ArrayList of appointments. Maintain a sorted list of appointments based on the date and time of appointments.
-
Pros: It might be more efficient when checking for appointment clashes. We do not need to check our new appointment against all the appointments in the ArrayList. For example we can check from the last (latest) appointment down the list until a point where the next appointment ends before this appointment. At that point we can stop checking as we know that there will be no more clashes.
-
Cons: The efficiency gain when checking for clashes might be lost due to efficiency lost due to sorting being required.
-
3.3. Intuitive command prompt
3.3.1. Current implementation
The Intuitive Command Prompt feature is facilitated mainly by two classes: IntuitivePromptManager
and IntuitiveEntryCommand.
IntuitiveEntryCommand extends Command, and represents the logic to be
executed when the user enters an input during the execution of an intuitive command. The IntuitiveEntryCommand
communicates with the Model interface in order to add an input into, or remove an input from the
IntuitivePromptManager.
The IntuitivePromptManager exists to store the inputs entered by the user during the execution of an
intuitive command, and once all prompts or fields of the intuitive command have been filled, uses the stored inputs
to prepare a String that represents a non-intuitive command (e.g. add n/NAME p/PHONE …) back to the
AddressBookParser in order to execute this command.
The IntuitivePromptManager also has an ArgumentManager
that determines how to keep track of the arguments for its respective intuitive command.
IntuitivePromptManager has six public-access methods that allow the Model to communicate with it.
They are the following:
With the above operations in mind, below is an example usage scenario of how an intuitive command works at each step.
We will be using the example of an intuitive add command.
Start of Intuitive Command
The intuitive command first needs to be triggered:
Step 1. User wishes to add a new patient. User types add into the command prompt and submits.
Step 2. AddressBookParser parses the input and detects the add command word without any trailing arguments.
Intuitive mode is triggered and a new IntuitiveEntryCommand is created.
Step 3. LogicManager executes the IntuitiveEntryCommand.
IntuitiveEntryCommand interfaces with Model to add and store the user’s input
in the IntuitivePromptManager.
Step 4. Model calls the IntuitivePromptManager to store the user’s input as an argument. Since the user’s
input is the add command word, the IntuitivePromptManager triggers it’s intuitive mode - it creates the respective
ArgumentManager (in this case it is an AddArgumentManager) and stores it in a variable called argumentManager.
Step 5. Model then calls the IntuitivePromptManager to retrieve the next prompt to be shown to the user.
IntuitivePromptManager asks argumentManager to retrieve the correct instruction.
This String instruction representing the prompt to be shown is then returned by IntuitivePromptManager and Model then
proceeds to return this String instruction to the executing IntuitiveEntryCommand.
Step 6. IntuitiveEntryCommand uses the String instruction to create a new CommandResult, which is then returned
to the LogicManager to be displayed to the user.
The following two sequence diagrams (Figures 11 & 12) describes the above process:
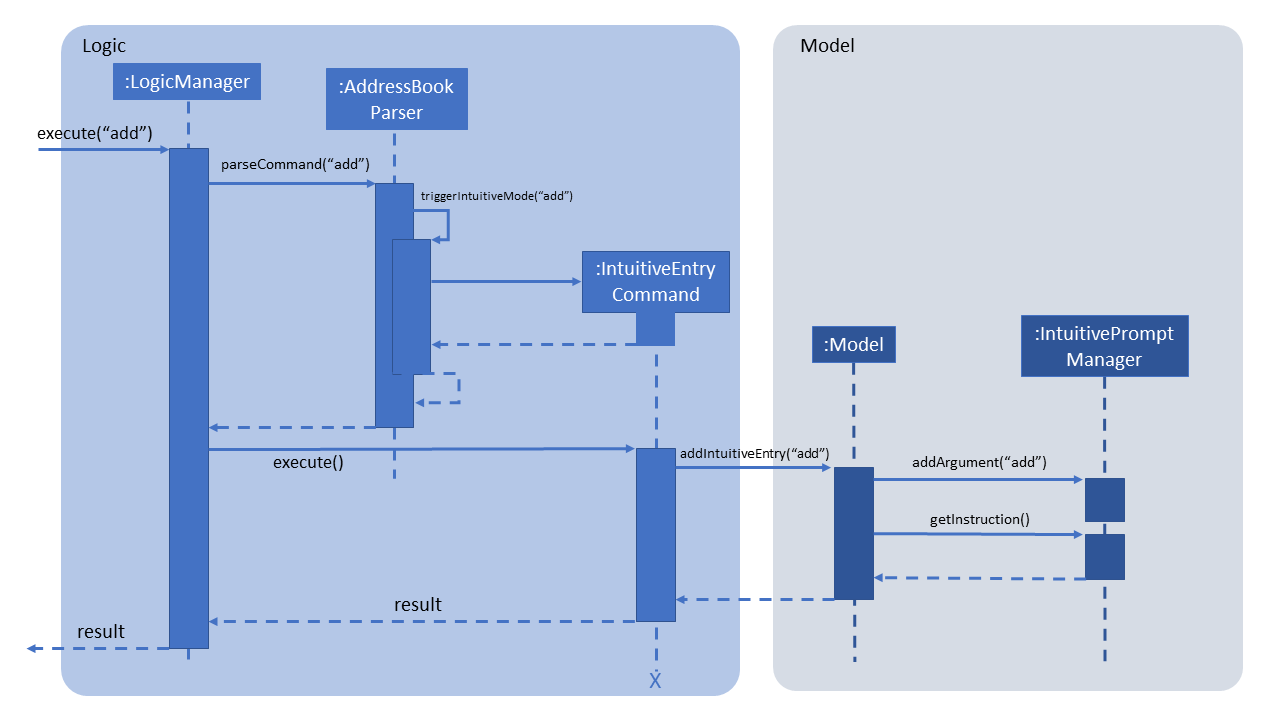
Logic and Model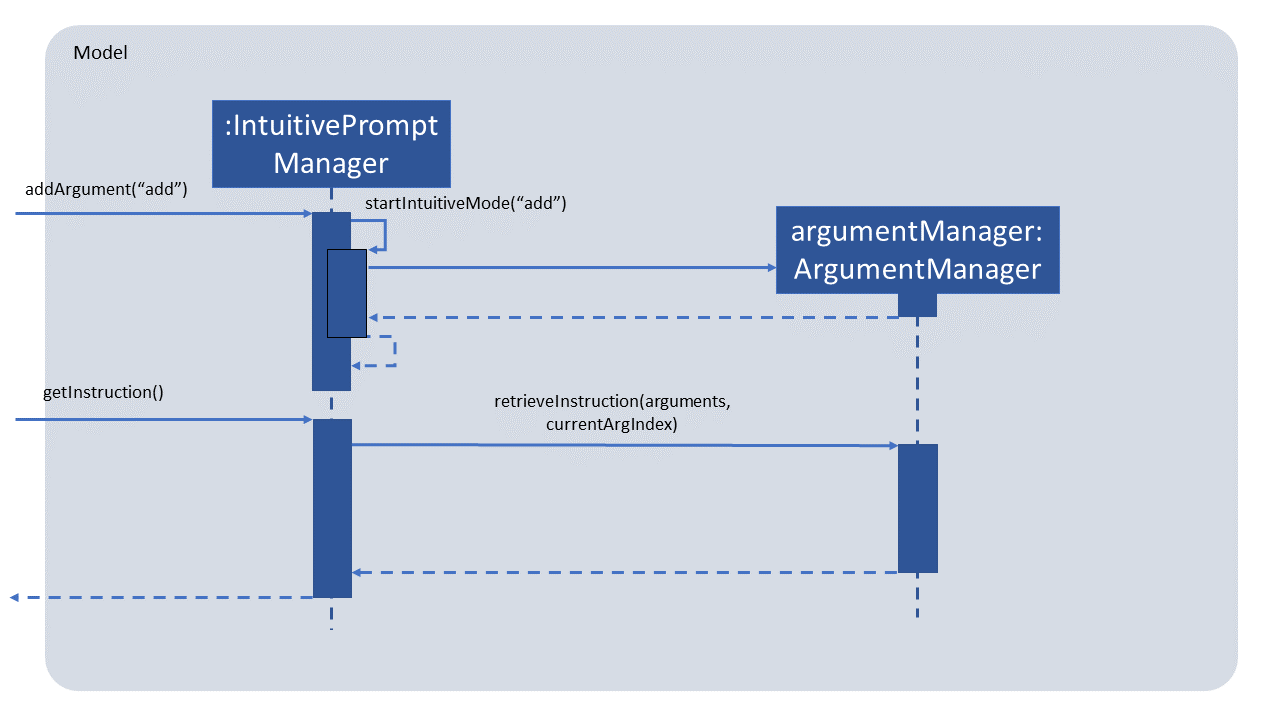
IntuitivePromptManager interacts with argumentManagerMiddle of Intuitive Command
As the intuitive command has now started and is in the midst of execution, the system prompts the user for an input for the next field:
Step 1. The system displays the instruction which prompts the user for the role of the person to be added.
The user enters patient to indicate that the person added is a patient.
Step 2-3. These steps are similar to Steps 2-3 of the above section (Start of Intuitive Command), with the exception that the input is now patient
Step 4. Model calls the IntuitivePromptManager to store the user’s input as an argument. Since the intuitive
command is already executing, the user’s input is stored as an argument in the arguments list.
The currentArgIndex, which allows the IntuitivePromptManager to determine the what field it should prompt for next
is incremented accordingly by the ArgumentManager:
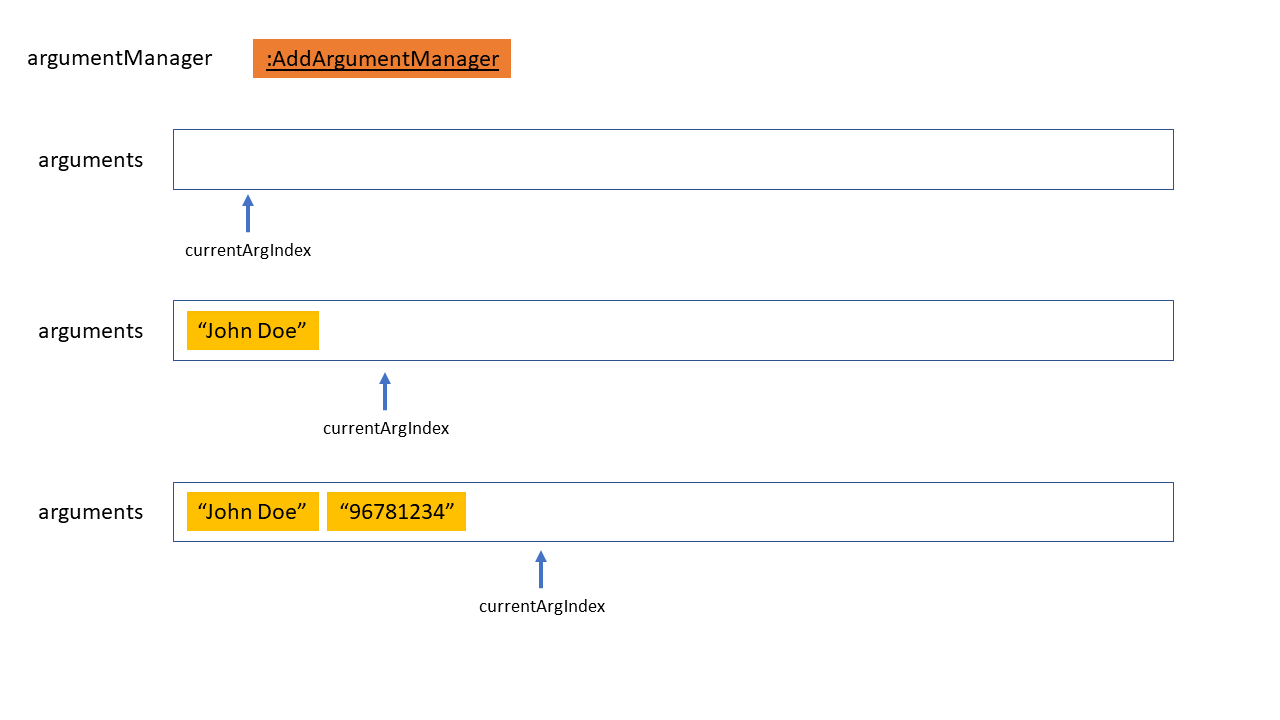
arguments list in IntuitivePromptManager records arguments with currentArgIndexStep 5-6. These steps are the same as that of the above section (Start of Intuitive Command)
End of Intuitive Command
Once all fields have been filled by the user, the system will exit intuitive mode as follows:
Step 1-3. These steps are the same as those of the above section (Start of Intuitive Command). Take note that this is the last field that the user has to fill.
Step 4. Model calls the IntuitivePromptManager to store the user’s input as an argument. The input is
stored as an argument in the arguments list. The IntuitivePromptManager detects that this is the last
field required to be filled and calls IntuitivePromptManager#exitIntuitiveMode() to signal the end of
the intuitive command.
Step 5. Model retrieves the next prompt from the IntuitivePromptManager but since there are no more
fields needing to be filled, IntuitivePromptManager returns a loading message to be displayed to the user,
to inform the user that the intuitive command is complete and the arguments provided by the user are being processed
Step 6. LogicManager detects that the intuitive command has exited and that there are arguments stored in the
IntuitivePromptManager. Using the Model interface, it requests to retrieve the arguments in the
IntuitivePromptManager as a String line (representing a non-intuitive command).
Step 7. This String line is passed into the AddressBookParser to be parsed. The sequence flow from here is
the same as if the user entered the non-intuitive version of the command.
The following sequence diagram describes Step 6 and onwards.
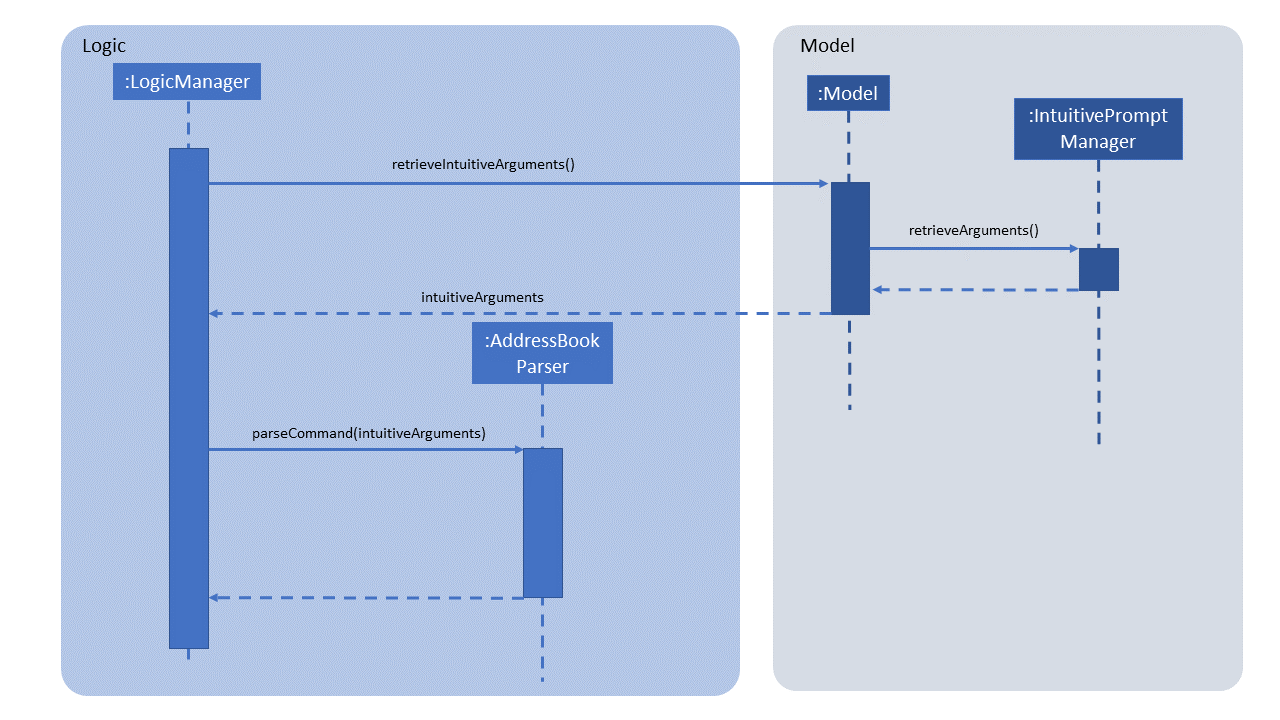
Going Back
The user has the ability to undo the inputs that he enters into each field. This is known as going back,
and is achieved when the user types /bk. The following usage scenario describes how this takes place:
Step 1. The user decides to undo his input for the previous field, and types /bk.
Step 2. The system behaves as per normal as mentioned above, treating /bk as a normal input.
Step 3. When IntuitiveEntryCommand#execute() is called, it detects that the input is the go back command
/bk. It calls Model#removeIntuitiveEntry() to remove the input filled into the latest field.
Step 4. Model#removeIntuitiveEntry() calls IntuitivePromptManager#removeArgument(), and the
IntuitivePromptManager removes the input filled into the latest field. currentArgIndex is decremented
as accordingly by the ArgumentManager as shown in the code snippet below:
public void removeArgument() {
    if (currentArgIndex <= ArgumentManager.MIN_ARGUMENT_INDEX) {
        return;
    }

    currentArgIndex = argumentManager.removeArgumentForCommand(arguments, currentArgIndex);
}
Step 5. Model retrieves the instruction of the field indicated by the currentArgIndex of the
IntuitivePromptManager. Execution continues normally as described in the above sections.
The following two sequence diagrams (Figures 15 & 16) describe the above process:
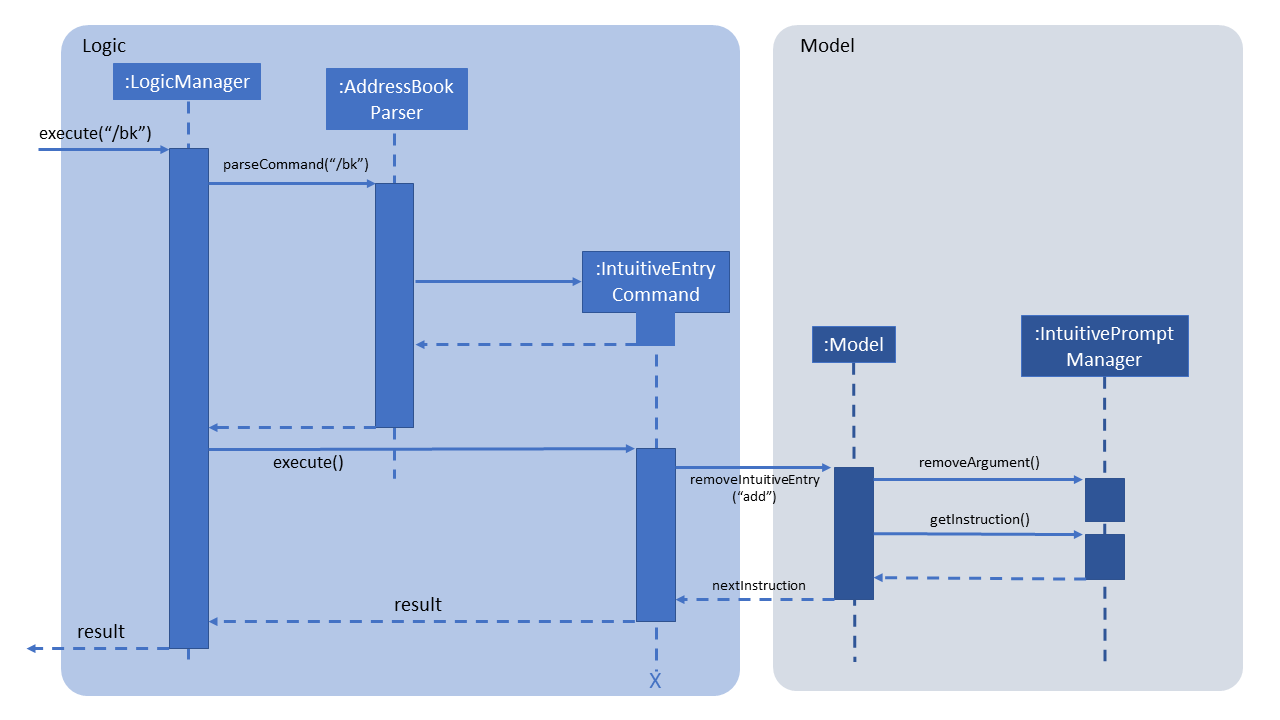
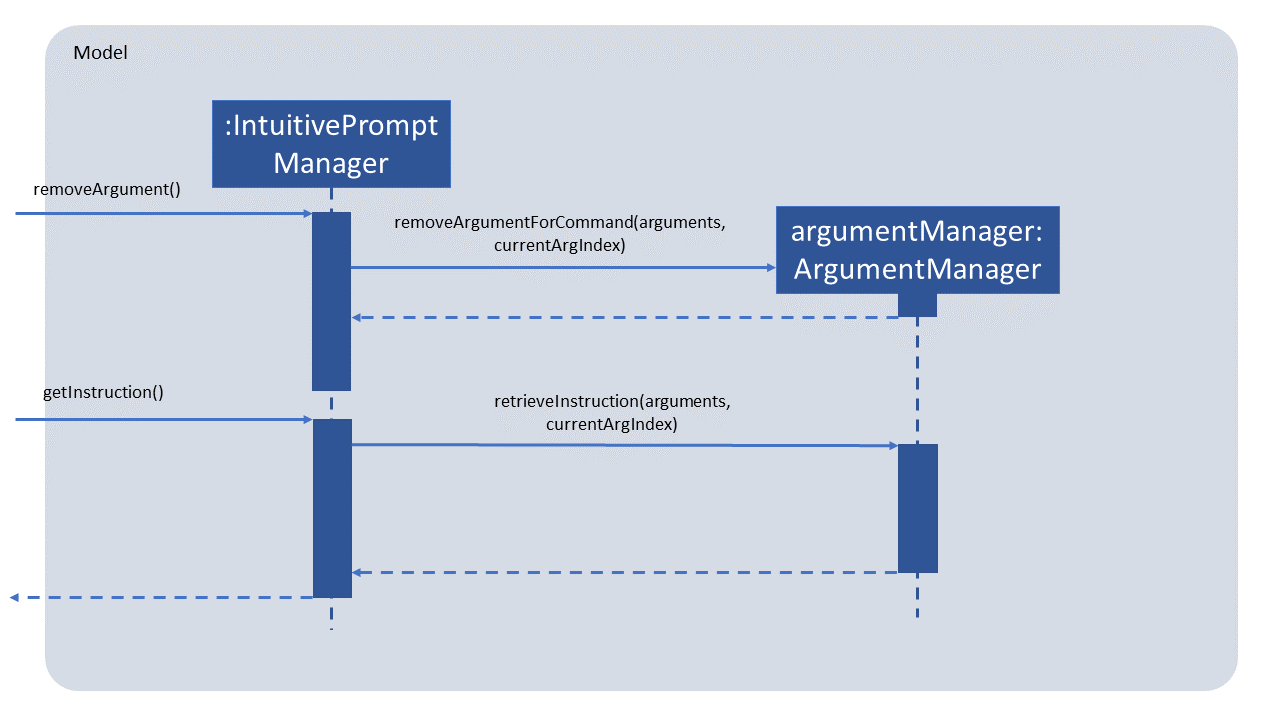
3.3.2. Commands & Argument Managers
The following XYZArgumentManagers inherit from ArgumentManager. They handle arguments for and represent the different commands as stated below:
-
AddArgumentManager: Represents the intuitiveaddcommand -
DeleteArgumentManager: Represents the intuitivedeletecommand -
FindArgumentManager: Represents the intuitivefindcommand -
EditArgumentManager: Represents the intuitiveeditcommand -
ScheduleArgumentManager: Represents the intuitiveschedulecommand -
UpdateArgumentManager: Represents the intuitiveupdatecommand
3.4. Display doctor’s current availability feature
3.4.1. Current implementation
The display of each doctor’s current availability is facilitated by PersonProfilePage, Doctor, AppointmentManager.
Given below is an example usage scenario of how the information is generated and propagated to be displayed in the
PersonProfilePage at the final stage.
Step 1. The user launches the application for the first time. The MainWindow will be initialized.
Step 2. The user then selects one of the doctors to view his/her profile via the PersonProfilePage.
Step 3. This then loads the PersonProfilePage that displays all of the person’s particulars, be it a doctor or
patient. In the event that this PersonProfilePage belongs to a doctor, it calls the method
Doctor#currentAvailStatus to retrieve information on the doctor’s current availability.
Step 4. Next, upon calling the method Doctor#currentAvailStatus, a helper method in AppointmentManager, called
AppointmentManager#isAnyAppointmentOngoing executes.
Step 5. AppointmentManager retrieves the current locale date and time from our Date and Time class and compare the
current time with all the scheduled appointments that the doctor has, and determines if the doctor is currently
available.
Step 6. The status information generated in AppointmentManager is propagated back up to the
PersonProfilePage which then sets a badge (available/busy) to reflect the availability status of that doctor.
Step 7. As long as the user remains on the same PersonProfilePage, this method continues to run in the background,
providing real time update of the doctor’s availability at that point in time.
The following sequence diagram summarizes what happens when a user launches the application:
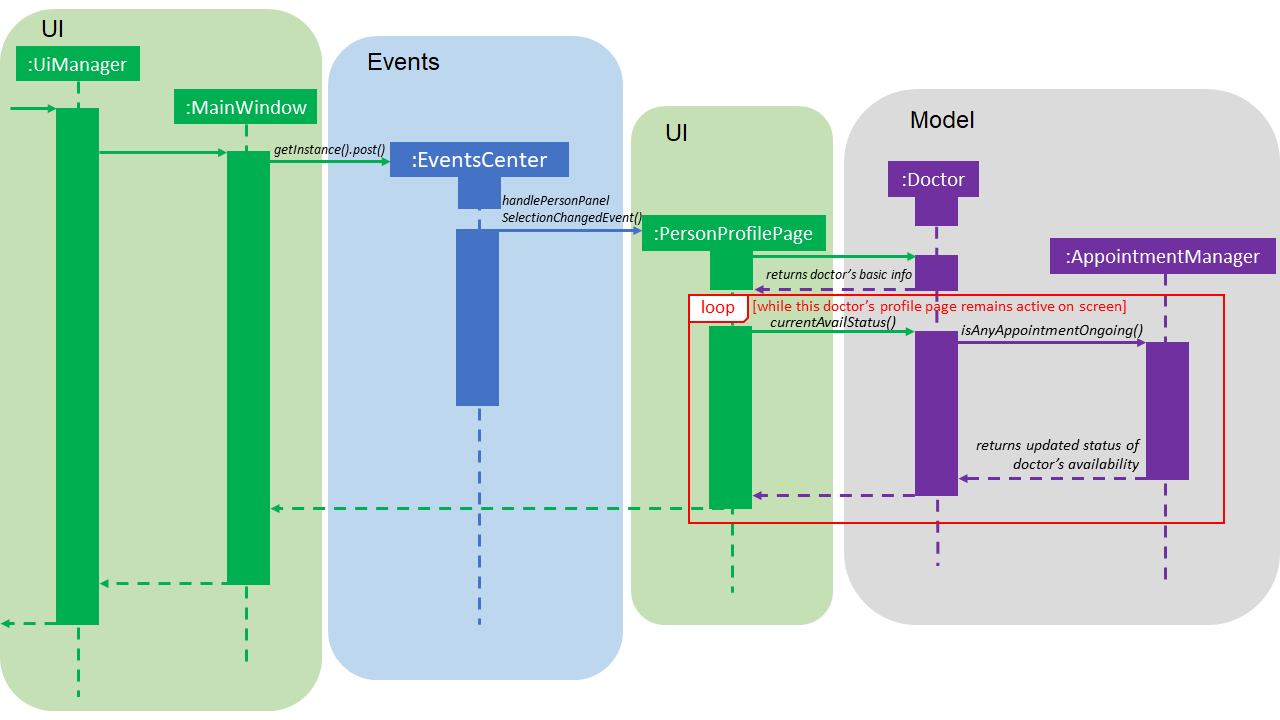
3.4.2. Design considerations
This section describes the pros and cons of the current and other alternate implementations of the doctor’s availability feature.
Aspect: How to display each doctor’s availability
-
Alternative 1 (current choice): A badge in each doctor’s
PersonProfilePagedisplay that shows his/her current availability.-
Pros: Provides convenience for the user to refer to since the badge is always on the display.
-
Cons: Limits to only checking and viewing the availability status of one doctor at a time, thus will not be able to get a consolidated list/view of all doctors who are available or busy at the moment.
-
-
Alternative 2: A separate command that the user can call upon to look up the current availability of all doctors.
-
Pros: Allows the user to call this method repeatedly/when needed and the user will be provided with the latest information.
-
Cons: Raises a need to have a separate command dedicated to this feature which may not be necessary and not as convenient as compared to having a badge that is on the display at all times and will auto-update itself. Also, this adds on to the list of commands that the user has to get familiar with.
-
Aspect: How to update the status of each doctor’s availability
-
Alternative 1 (current choice): A function that will refresh the badge every few seconds.
-
Pros: Provides accurate information and real time update on the doctor’s availability and it is easy to implement. Given below is a code snippet of how this feature is implemented:
if (person instanceof Doctor) { setAvailabilityOfDoctor(); animationTimer.start(); // Updates availability badge of doctor every second // to reflect real time status. } else { assert person instanceof Patient; animationTimer.stop(); hideDoctorFields(); } -
Cons: Affects the performance of the application due to this function continuously running in the background.
-
-
Alternative 2: Updates the status/badge only on launch of application and only when there is a change in information stored in the database.
-
Pros: Offers an easier implementation method.
-
Cons: Does not auto-update the information and thus the information will be outdated and unreliable.
-
3.5. Switch command feature
3.5.1. Current implementation
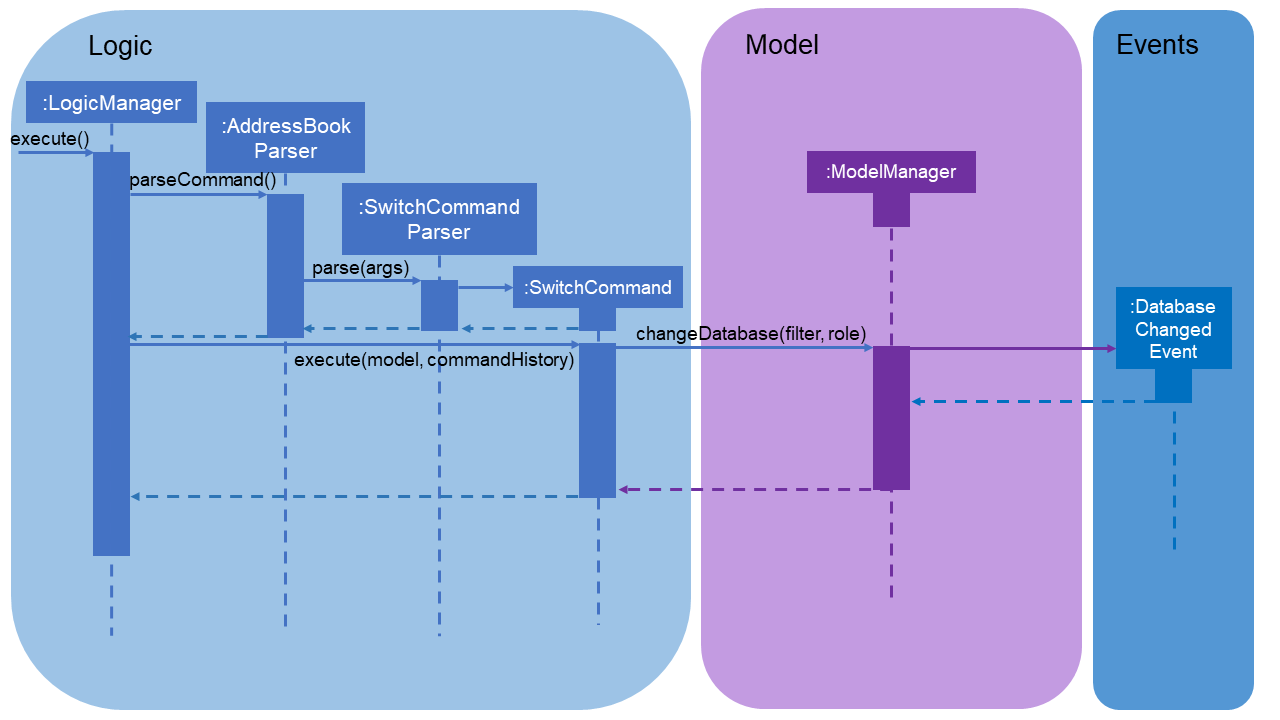
The switching of database functionality is facilitated by SwitchCommand, SwitchCommandParser and ModelManager and
DatabaseChangedEvent. DatabaseChangedEvent extends from Events,SwitchCommand extends from Command and
SwitchCommandParser extends from Parser.
Given
below is an example usage scenario of the database is segmented into the two different sub-databases, i.e. patient and doctor.
Step 1. The user switches over to view the doctor’s database. User enters the command switch r/doctor.
Input parameter for r/ROLE is case-insensitive
|
Step 2. This then calls the SwitchCommandParser and it will parse the inputs and creates a new SwitchCommand.
Step 3. Next, this triggers the ModelManager#changeDatabase method, which then updates the filteredPersons in
the ModelManager. At the same time, a new DatabaseChangedEvent is created that will trigger the relevant
components in the UI that are subscribed to this event, updating those components base on this new change in the
database.
The following sequence diagram summarizes what happens when a user switches the database:
3.5.2. Design considerations
This section describes the pros and cons of the current and other alternate implementations the switch command feature.
Aspect: How to divide the database into two different sub-databases
-
Alternative 1 (current choice): An additional filter layered upon the database instead of having 2 different databases.
-
Pros: Offers an easier implementation method, because it only needs to implement a filter on the data. More importantly, there will be less issues with certain commands such as the
ScheduleCommand. This is because such commands requires updating both the patient’s and the doctor’s data. As such, this implementation allows the system to still have access to both parties' data, since they are actually not stored in different places, facilitating the update of data on both side. -
Cons: Reduces the speed and efficiency of the system since there are more data being dealt with when it could have been halved (refer to Alternative 2).
-
-
Alternative 2: Two different databases to store patients' and doctors' data separately.
-
Pros: Improves the efficiency of the system since the data that is being dealt with and processed, is halved (i.e. there will only be patients' data, without the additional doctors' data, or vice versa)
-
Cons: Creates issues for certain commands such as the
ScheduleCommand. To elaborate,ScheduleCommandupdates the data for both the doctor and the patient. However this implementation means that the system only has access to one particular database (i.e. either patient or doctor) and thus this will hinder and cause inconvience as it will create a need for a method to propogate this information to the other database that is inactive at the moment.
-
3.6. Update command feature
3.6.1. Current implementation
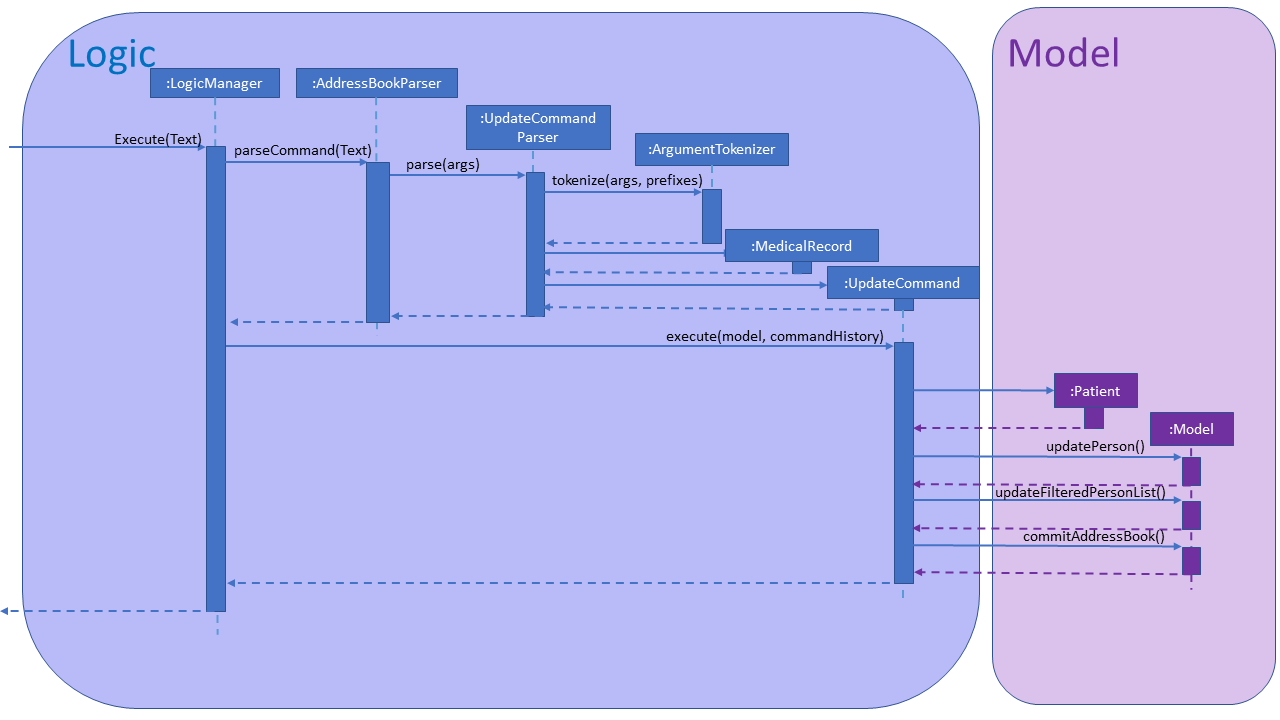
The updating medical record mechanism is facilitated by UpdateCommandParser, UpdateCommand and MedicalRecord.
UpdateCommand extends from Command and UpdateCommandParser extends from Parser.
The key operation implemented is UpdateCommand#execute.
Given below is an example usage scenario and how the update command mechanism behaves at each step.
Step 1. The user wants to update the medical record library of a Patient. User proceeds to fill in the details behind the respective prefixes.
For example: update 1 d/16.10.2018 dg/flu tr/tamiflu c/to be taken thrice a day
Step 2. The user executes the command which calls the UpdateCommandParser.
UpdateCommandParser will first parse the inputs and create a MedicalRecord with the given date, diagnosis, treatment and comment, and return an UpdateCommand with the new MedicalRecord.
| If no comment is given the default comment "-" is used. |
Step 3. UpdateCommand will then be executed.
UpdateCommand will first do the following checks on the user input to ensure that the command input was valid:
Checks:
-
Whether the index of input person is valid.
-
Whether the person specified by the index is a patient.
-
Whether the specified date is a valid date.
-
Whether the specified date is before the current date.
-
Whether the input contain invalid prefixes.
If it was invalid, an exception message will be thrown and the MedicalRecord will not be added into the patient’s medical record library.
Step 4. If the checks are successful, all the attributes of the specified person will first be copied, including the existing medical record library of the specified Patient.
Step 5. The new MedicalRecord will be added into the copied medical record library which is an ArrayList of MedicalRecord. The new MedicalRecord is added to the front of the list and since the pointer for the latest medical record is always pointing to the first element, the latest medical record will be automatically updated.
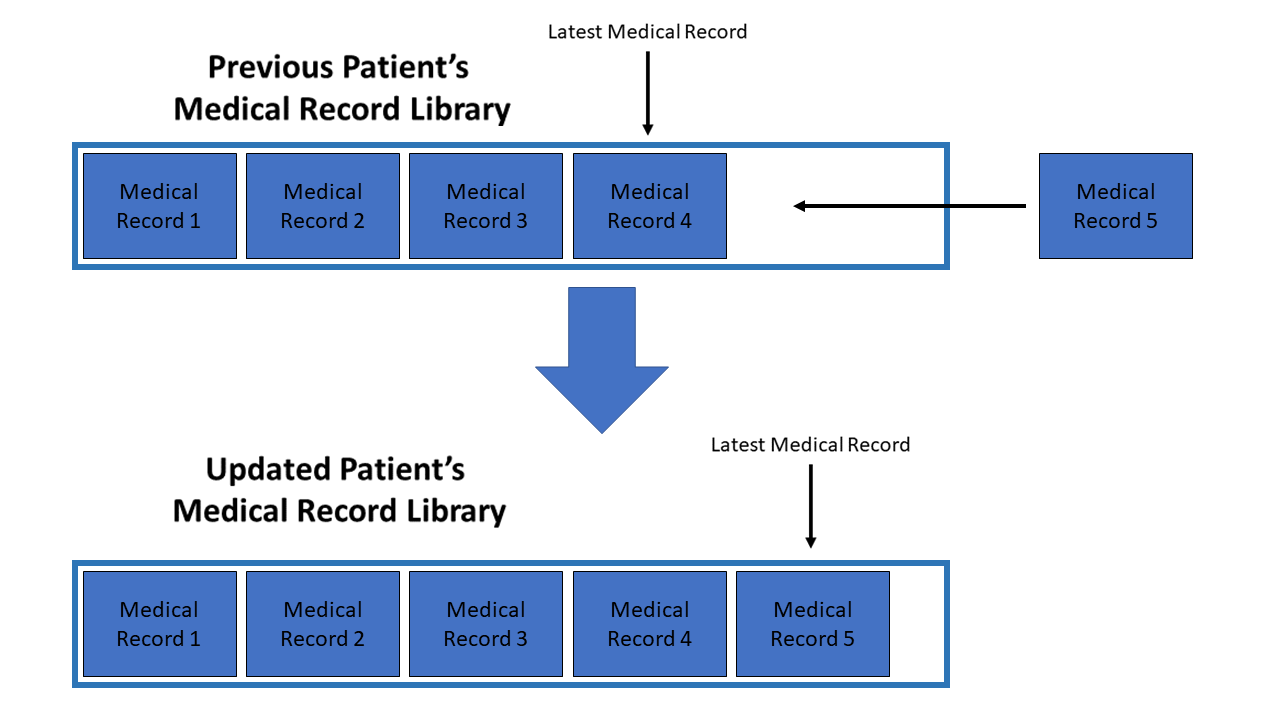
Step 6. A new Patient is created with all the copied attributes and the updated medical record library.
Step 7. The existing Patient that was specified is updated to the newly created Patient in the model.
The following sequence diagram shows how the update medical record operation works:
3.6.2. Design considerations
This section describes the pros and cons of the current and other alternate implementations of updating medical records.
Aspect: How to store a patient’s medical record library
-
Alternative 1 (current choice): Use an ArrayList of
MedicalRecordas the patient’s medical record library.-
Pros: Accessing the most recent record by retrieving the first
MedicalRecordin the ArrayList is easy. Given below is a code snippet that demonstrates how this is done.if (medicalRecordLibrary.size() != 0) { return medicalRecordLibrary.get(medicalRecordLibrary.size() - 1); } else { return null; } -
Cons: Retrieving the latest
MedicalRecordbefore a specified date takes longer as eachMedicalRecordhas to be checked sequentially until the lastMedicalRecordbefore the specified date is found.
-
-
Alternative 2: Use a different data structure like a TreeMap of
MedicalRecordas the value and date for the key as the patient’s medical record library.-
Pros: Retrieving the latest
MedicalRecordbefore a specified date is made convenient by just using the floor function already defined in the TreeMap API. -
Cons: Maintaining the TreeSet for more complicated tasks like editing
MedicalRecordmay be difficult since a newMedicalRecordhas to be created and reinserted into the same location in the TreeSet.
-
3.7. Find command feature
3.7.1. Current implementation
The find mechanism is facilitated by FindCommand, FindCommandParser and PersonContainsKeywordPredicate.
FindCommand extends from Command, FindCommandParser implements Parser and PersonContainsKeywordPredicate
implements Predicate.
The key operation implemented is FindCommand#execute.
Given below is an example usage scenario and how the find command mechanism behaves at each step.
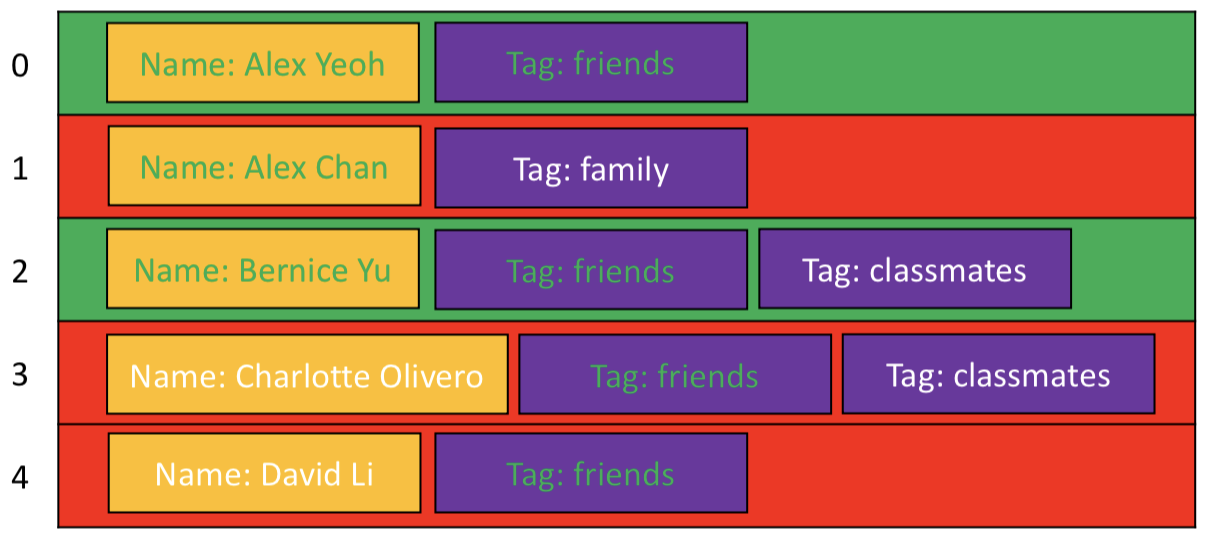
Step 1. The user wants to find all Person whom have a friends Tag, with Name either Alex or Bernice by
executing find n/Alex n/Bernice t/friends.
Step 2. FindCommandParser will parse the input and verify that is it valid before creating a
PersonContainsKeywordsPredicate, which is passed into FindCommand. Then, FindCommand is returned.
-
PersonContainsKeywordPredicatetakes in aHashMapofPrefixmapped to anArrayListof search parameters. The code snippet below illustrates how aFindCommandis created:
public FindCommand parse(String args) throws ParseException {
        ...
        // Performs checks to see if the arguments entered are valid.
        ...
        // Process arguments into a HashMap personSearchKeywords which is used to create a PersonContainsKeywordsPredicate to be passed into FindCommand.
        ...
        return new FindCommand(new PersonContainsKeywordsPredicate(personSearchKeywords));
}-
PersonContainsKeywordPredicatetests if aPersonshould appear when searched by iterating through each of the keys in theHashMapand returningtrueif all of thePerson's attributes match at least 1 of the entries in each key’sArrayList. The image below illustrates the list ofPersonthat returntrueforPersonContainsKeywordPredicate#testafter the user inputfind n/Alex n/Bernice t/friends.
-
As can be seen in the image above,
Personat index 0 and index 2 have at least 1 entry inNameandTagthat match the required search parameters. Therefore, they will be shown in the result list. Even thoughPersonat index 1 has a match in theNameattribute, he does not have afriendsTagand is therefore not shown.
If there is no input after the "find" keyword, IntuitiveEntryCommand will be triggered, which will prompt the user to
input search parameters.
|
Step 3. FindCommand will then be executed.
Step 4. Model#updateFilteredPersonList() will be called, which uses PersonContainsKeywordPredicate to update
Model to show all Person that contains the searched parameters.
The following activity diagram summarises what happens when a user launches the application:
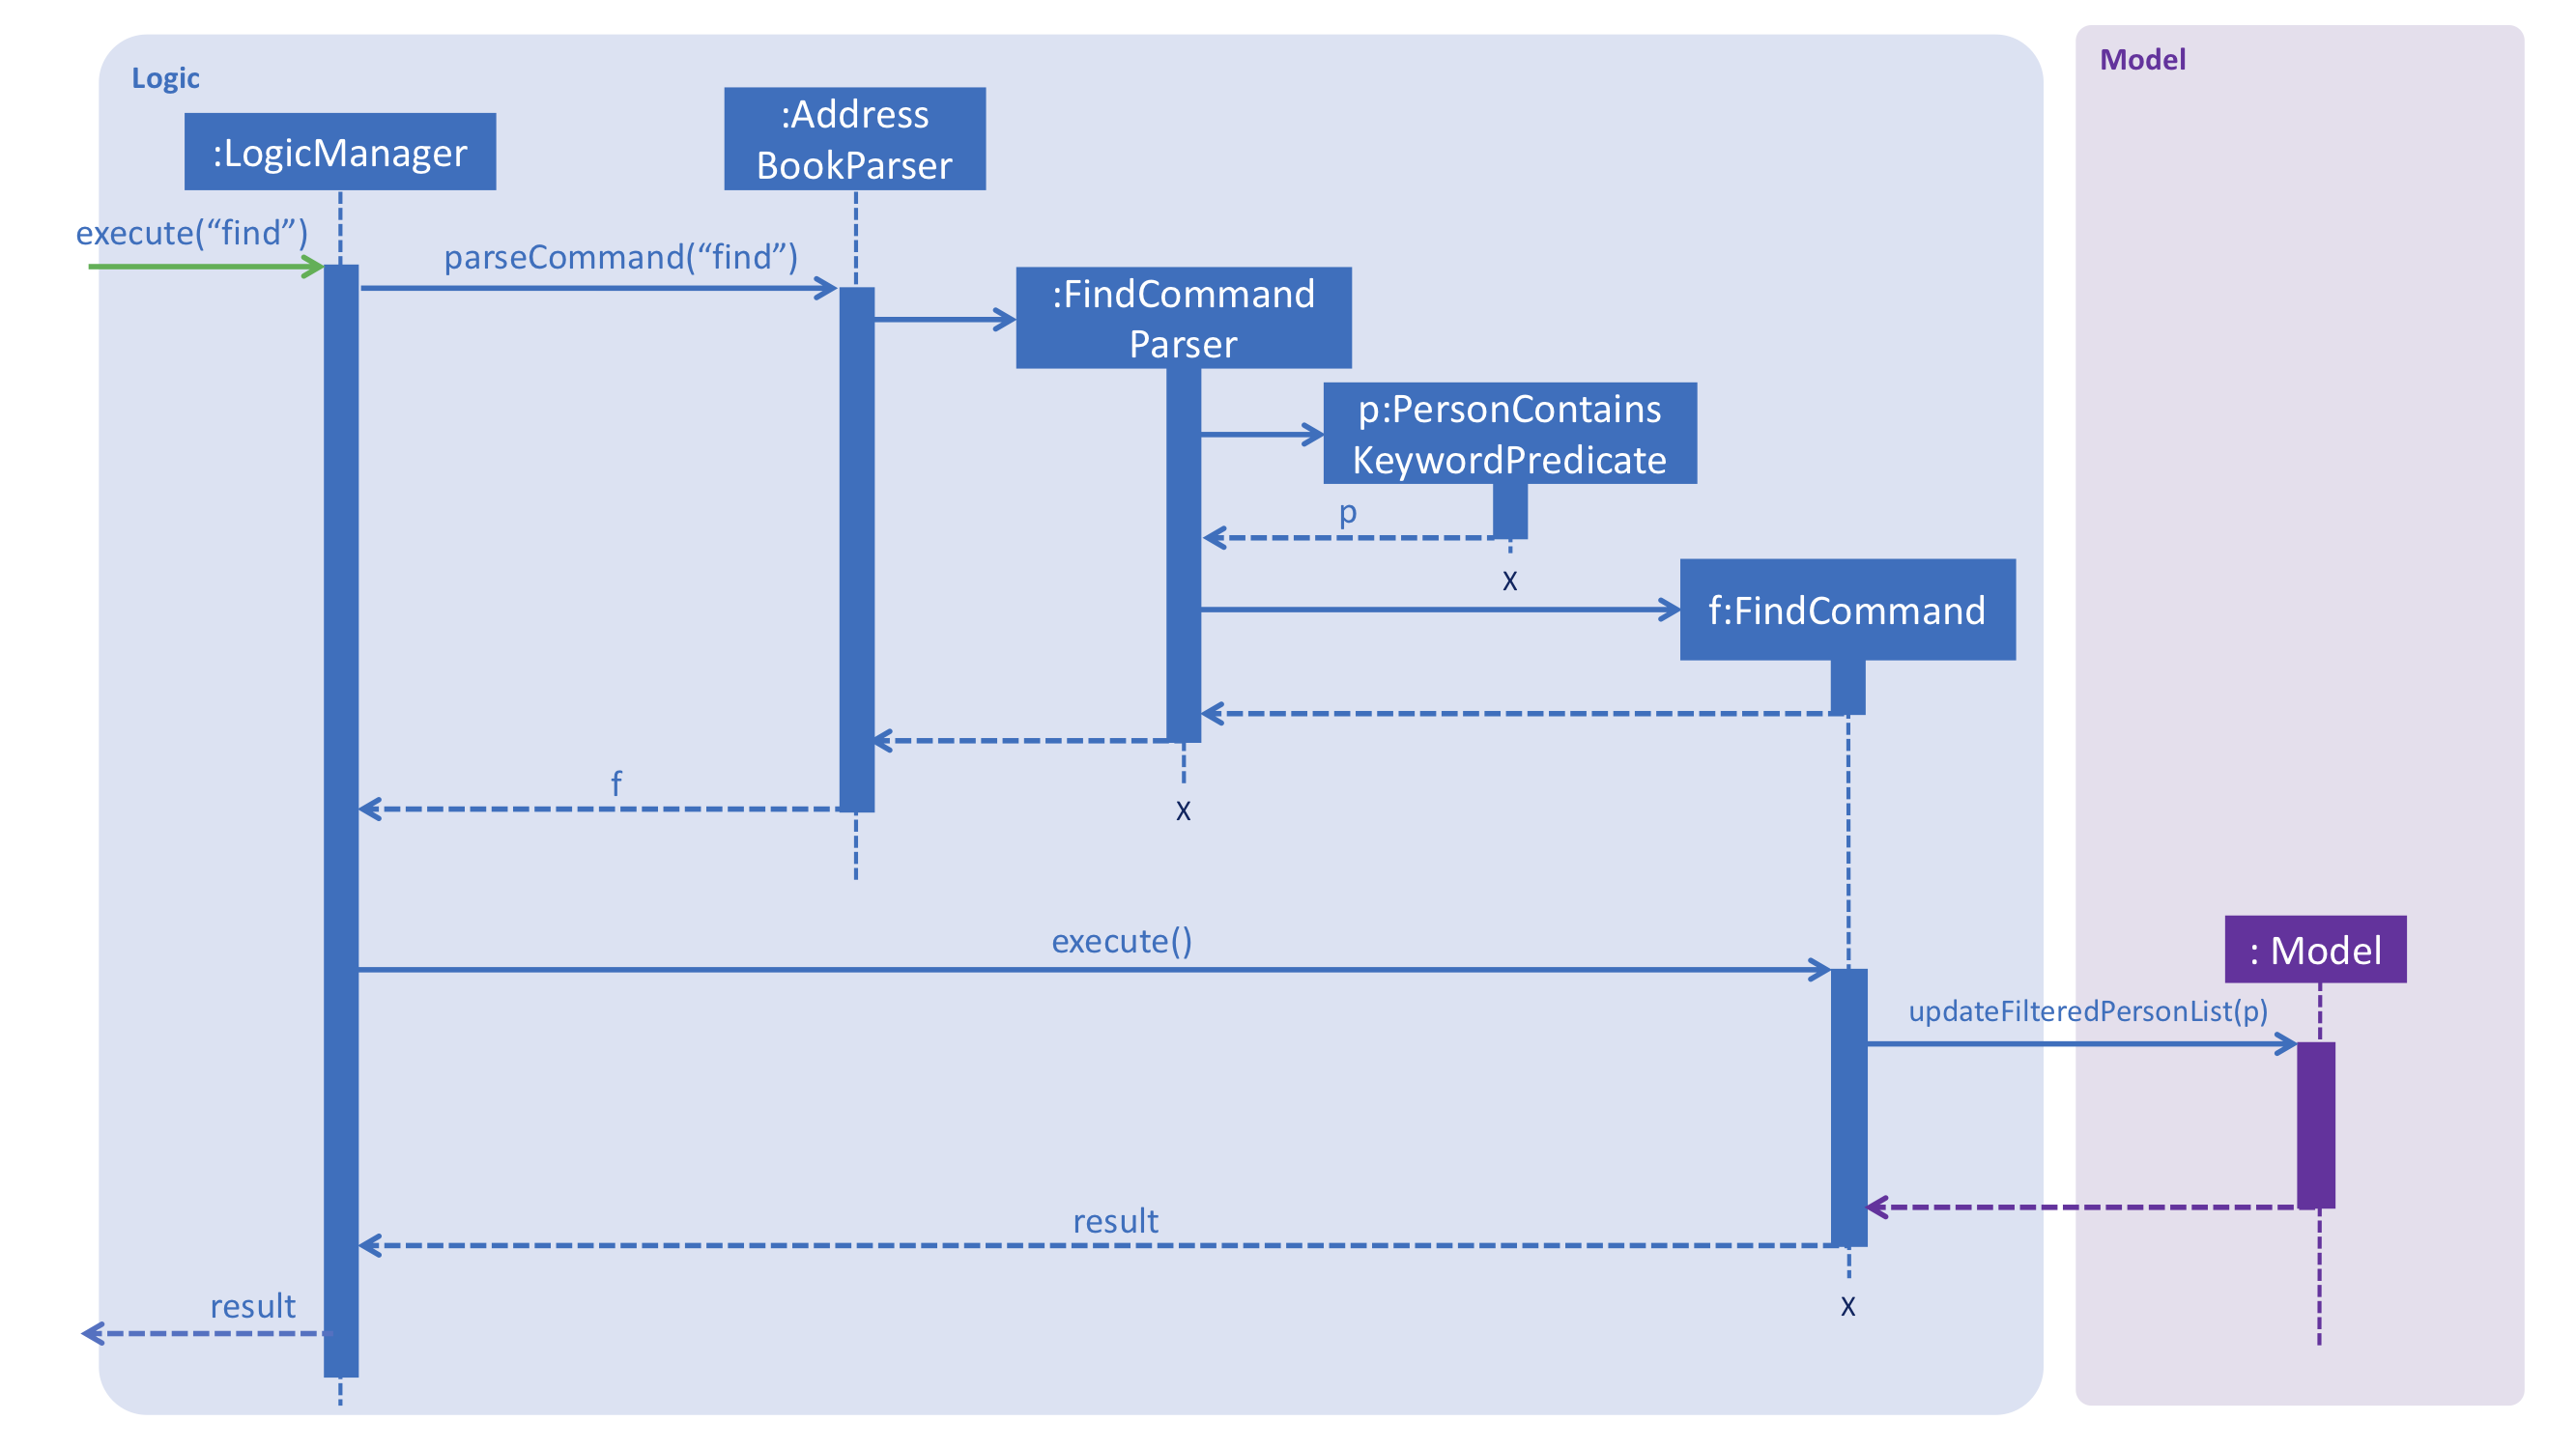
3.7.2. Design considerations
Aspect: How to input search fields
-
Alternative 1 (current choice): Allow users to perform searches by specifying certain keywords of interest. (For example:
Name:n/,Phone:p/)-
Pros: It results in a powerful and precise search function by providing the user the option to specify exactly which
Personattributes are of interest. -
Cons: It may be difficult for newer users to remember the shortcuts that represent the attributes of interest.
-
-
Alternative 2: Generalise the search function by searching through all fields and providing the most relevant information through predictive search.
-
Pros: It provides an even more powerful search function that is both simple to use and accurate.
-
Cons: It is incredibly difficult to implement such a search function without the use of machine-learning algorithms or an internet connection.
-
3.8. Logging
We are using java.util.logging package for logging. The LogsCenter class is used to manage the logging levels and logging destinations.
-
The logging level can be controlled using the
logLevelsetting in the configuration file (See Section 3.9, “Configuration”) -
The
Loggerfor a class can be obtained usingLogsCenter.getLogger(Class)which will log messages according to the specified logging level -
Currently log messages are output through:
Consoleand to a.logfile.
Logging Levels
-
SEVERE: Critical problem detected which may possibly cause the termination of the application -
WARNING: Can continue, but with caution -
INFO: Information showing the noteworthy actions by the App -
FINE: Details that is not usually noteworthy but may be useful in debugging e.g. print the actual list instead of just its size
3.9. Configuration
Certain properties of the application can be controlled (e.g App name, logging level) through the configuration file (default: config.json).
4. Documentation
We use asciidoc for writing documentation.
| We chose asciidoc over Markdown because asciidoc, although a bit more complex than Markdown, provides more flexibility in formatting. |
4.1. Editing documentation
See UsingGradle.adoc to learn how to render .adoc files locally to preview the end result of your edits.
Alternatively, you can download the AsciiDoc plugin for IntelliJ, which allows you to preview the changes you have made to your .adoc files in real-time.
4.2. Publishing documentation
See UsingTravis.adoc to learn how to deploy GitHub Pages using Travis.
4.3. Converting documentation to PDF format
We use Google Chrome for converting documentation to PDF format, as Chrome’s PDF engine preserves hyperlinks used in webpages.
Here are the steps to convert the project documentation files to PDF format.
-
Follow the instructions in UsingGradle.adoc to convert the AsciiDoc files in the
docs/directory to HTML format. -
Go to your generated HTML files in the
build/docsfolder, right click on them and selectOpen with→Google Chrome. -
Within Chrome, click on the
Printoption in Chrome’s menu. -
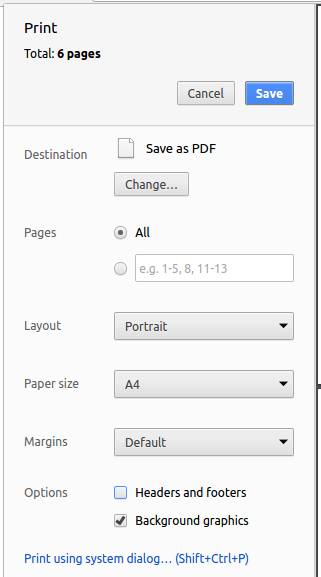
Set the destination to
Save as PDF, then clickSaveto save a copy of the file in PDF format. For best results, use the settings indicated in the screenshot below.
4.4. Site-wide documentation settings
The build.gradle file specifies some project-specific asciidoc attributes which affects how all documentation files within this project are rendered.
Attributes left unset in the build.gradle file will use their default value, if any.
|
Shown below is a list of site-wide attributes and a short description for each attribute.
| Attribute name | Description | Default value |
|---|---|---|
|
The name of the website. If set, the name will be displayed near the top of the page. |
not set |
|
URL to the site’s repository on GitHub. Setting this will add a "View on GitHub" link in the navigation bar. |
not set |
|
Define this attribute if the project is an official SE-EDU project. This will render the SE-EDU navigation bar at the top of the page, and add some SE-EDU-specific navigation items. |
not set |
4.5. Per-file documentation settings
Each .adoc file may also specify some file-specific asciidoc attributes which affects how the file is rendered.
Asciidoctor’s built-in attributes may be specified and used as well.
Attributes left unset in .adoc files will use their default value, if any.
|
Shown below is a list of per-file attributes and a short description for each.
| Attribute name | Description | Default value |
|---|---|---|
|
Site section that the document belongs to.
This will cause the associated item in the navigation bar to be highlighted.
One of: * Official SE-EDU projects only |
not set |
|
Set this attribute to remove the site navigation bar. |
not set |
4.6. Site template
The files in docs/stylesheets are the CSS stylesheets of the site.
You can modify them to change some properties of the site’s design.
The files in docs/templates controls the rendering of .adoc files into HTML5.
These template files are written in a mixture of Ruby and Slim.
|
Modifying the template files in |
5. Testing
5.1. Running tests
There are three ways to run tests.
| The most reliable way to run tests is the 3rd one. The first two methods might fail some GUI tests due to platform/resolution-specific idiosyncrasies. |
Method 1: Using IntelliJ JUnit test runner
-
To run all tests, right-click on the
src/test/javafolder and chooseRun 'All Tests'. -
To run a subset of tests, you can right-click on a test package, test class, or a test and choose
Run 'ABC'.
Method 2: Using Gradle
-
Open a console and run the command
gradlew clean allTests. (Mac/Linux:./gradlew clean allTests)
| See UsingGradle.adoc for more info on how to run tests using Gradle. |
Method 3: Using Gradle (headless)
Thanks to the TestFX library we use, our GUI tests can be run in the headless mode. In the headless mode, GUI tests do not show up on the screen. That means the developer can do other things on the Computer while the tests are running.
To run tests in headless mode, open a console and run the command gradlew clean headless allTests. (Mac/Linux: ./gradlew clean headless allTests)
5.2. Types of tests
We have two types of tests:
-
GUI Tests - These are tests involving the GUI. They include,
-
System Tests that test the entire App by simulating user actions on the GUI. These are in the
systemtestspackage. -
Unit tests that test the individual components. These are in
seedu.address.uipackage.
-
-
Non-GUI Tests - These are tests not involving the GUI. They include,
-
Unit tests targeting the lowest level methods/classes.
e.g.seedu.address.commons.StringUtilTest -
Integration tests that are checking the integration of multiple code units (those code units are assumed to be working).
e.g.seedu.address.storage.StorageManagerTest -
Hybrids of unit and integration tests. These test are checking multiple code units as well as how the are connected together.
e.g.seedu.address.logic.LogicManagerTest
-
5.3. Troubleshooting testing
Problem: HelpWindowTest fails with a NullPointerException.
-
Reason: One of its dependencies,
HelpWindow.htmlinsrc/main/resources/docsis missing. -
Solution: Execute Gradle task
processResources.
6. Dev Ops
6.1. Build automation
See UsingGradle.adoc to learn how to use Gradle for build automation.
6.2. Continuous integration
We use Travis CI and AppVeyor to perform Continuous Integration on our projects. See UsingTravis.adoc and UsingAppVeyor.adoc for more details.
6.3. Coverage reporting
We use Coveralls to track the code coverage of our projects. See UsingCoveralls.adoc for more details.
6.4. Documentation previews
When a pull request has changes to asciidoc files, you can use Netlify to see a preview of how the HTML version of those asciidoc files will look like when the pull request is merged. See UsingNetlify.adoc for more details.
6.5. Making a release
Here are the steps to create a new release.
-
Update the version number in
MainApp.java. -
Generate a JAR file using Gradle.
-
Tag the repo with the version number. e.g.
v0.1 -
Create a new release using GitHub and upload the JAR file you created.
6.6. Managing dependencies
A project often depends on third-party libraries. For example, Address Book depends on the Jackson library for XML parsing. Managing these dependencies can be automated using Gradle. For example, Gradle can download the dependencies automatically, which is better than these alternatives.
a. Include those libraries in the repo. (this bloats the repo size)
b. Require developers to download those libraries manually. (this creates extra work for developers)
Appendix A: Suggested Programming Tasks to Get Started
Suggested path for new programmers:
-
First, add small local-impact (i.e. the impact of the change does not go beyond the component) enhancements to one component at a time. Some suggestions are given in Section A.1, “Improving each component”.
-
Next, add a feature that touches multiple components to learn how to implement an end-to-end feature across all components. Section A.2, “Creating a new command:
remark” explains how to go about adding such a feature.
A.1. Improving each component
Each individual exercise in this section is component-based (i.e. you would not need to modify the other components to get it to work).
Logic component
Scenario: You are in charge of logic. During dog-fooding, your team realize that it is troublesome for the user to type the whole command in order to execute a command. Your team devise some strategies to help cut down the amount of typing necessary, and one of the suggestions was to implement aliases for the command words. Your job is to implement such aliases.
Do take a look at Section 2.3, “Logic component” before attempting to modify the Logic component.
|
-
Add a shorthand equivalent alias for each of the individual commands. For example, besides typing
clear, the user can also typecto remove all persons in the list.
Model component
Scenario: You are in charge of model. One day, the logic-in-charge approaches you for help. He wants to implement a command such that the user is able to remove a particular tag from everyone in the address book, but the model API does not support such a functionality at the moment. Your job is to implement an API method, so that your teammate can use your API to implement his command.
Do take a look at Section 2.4, “Model component” before attempting to modify the Model component.
|
-
Add a
removeTag(Tag)method. The specified tag will be removed from everyone in the address book.
Ui component
Scenario: You are in charge of ui. During a beta testing session, your team is observing how the users use your address book application. You realize that one of the users occasionally tries to delete non-existent tags from a contact, because the tags all look the same visually, and the user got confused. Another user made a typing mistake in his command, but did not realize he had done so because the error message wasn’t prominent enough. A third user keeps scrolling down the list, because he keeps forgetting the index of the last person in the list. Your job is to implement improvements to the UI to solve all these problems.
Do take a look at Section 2.2, “UI component” before attempting to modify the UI component.
|
-
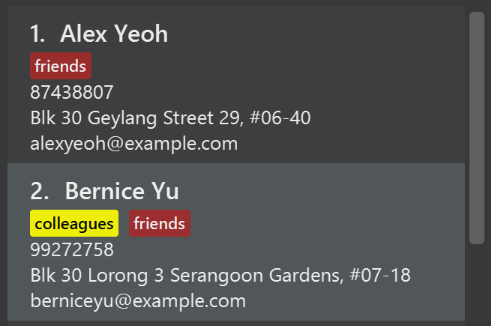
Use different colors for different tags inside person cards. For example,
friendstags can be all in brown, andcolleaguestags can be all in yellow.Before

After
-
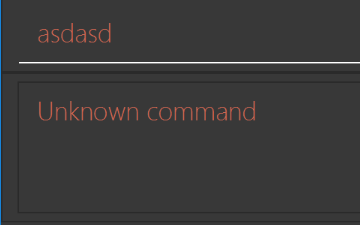
Modify
NewResultAvailableEventsuch thatResultDisplaycan show a different style on error (currently it shows the same regardless of errors).Before
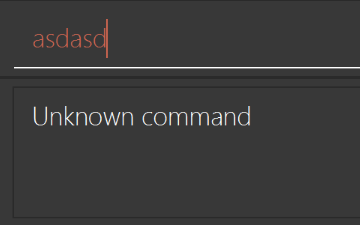
After
-
Modify the
StatusBarFooterto show the total number of people in the address book.Before

After

Storage component
Scenario: You are in charge of storage. For your next project milestone, your team plans to implement a new feature of saving the address book to the cloud. However, the current implementation of the application constantly saves the address book after the execution of each command, which is not ideal if the user is working on limited internet connection. Your team decided that the application should instead save the changes to a temporary local backup file first, and only upload to the cloud after the user closes the application. Your job is to implement a backup API for the address book storage.
Do take a look at Section 2.5, “Storage component” before attempting to modify the Storage component.
|
-
Add a new method
backupAddressBook(ReadOnlyAddressBook), so that the address book can be saved in a fixed temporary location.
A.2. Creating a new command: remark
By creating this command, you will get a chance to learn how to implement a feature end-to-end, touching all major components of the app.
Scenario: You are a software maintainer for addressbook, as the former developer team has moved on to new projects. The current users of your application have a list of new feature requests that they hope the software will eventually have. The most popular request is to allow adding additional comments/notes about a particular contact, by providing a flexible appointment field for each contact, rather than relying on tags alone. After designing the specification for the appointment command, you are convinced that this feature is worth implementing. Your job is to implement the appointment command.
A.2.1. Description
Edits the remark for a person specified in the INDEX.
Format: remark INDEX r/[REMARK]
Examples:
-
remark 1 r/Likes to drink coffee.
Edits the remark for the first person toLikes to drink coffee. -
remark 1 r/
Removes the remark for the first person.
A.2.2. Step-by-step Instructions
[Step 1] Logic: Teach the app to accept 'remark' which does nothing
Let’s start by teaching the application how to parse a remark command. We will add the logic of remark later.
Main:
-
Add a
RemarkCommandthat extendsCommand. Upon execution, it should just throw anException. -
Modify
AddressBookParserto accept aRemarkCommand.
Tests:
-
Add
RemarkCommandTestthat tests thatexecute()throws an Exception. -
Add new test method to
AddressBookParserTest, which tests that typing "remark" returns an instance ofRemarkCommand.
[Step 2] Logic: Teach the app to accept 'appointment' arguments
Let’s teach the application to parse arguments that our appointment command will accept. E.g. 1 r/Likes to drink coffee.
Main:
-
Modify
RemarkCommandto take in anIndexandStringand print those two parameters as the error message. -
Add
RemarkCommandParserthat knows how to parse two arguments, one index and one with prefix 'r/'. -
Modify
AddressBookParserto use the newly implementedRemarkCommandParser.
Tests:
-
Modify
RemarkCommandTestto test theRemarkCommand#equals()method. -
Add
RemarkCommandParserTestthat tests different boundary values forRemarkCommandParser. -
Modify
AddressBookParserTestto test that the correct command is generated according to the user input.
[Step 3] Ui: Add a placeholder for appointment in PersonCard
Let’s add a placeholder on all our PersonCard s to display a appointment for each person later.
Main:
-
Add a
Labelwith any random text insidePersonListCard.fxml. -
Add FXML annotation in
PersonCardto tie the variable to the actual label.
Tests:
-
Modify
PersonCardHandleso that future tests can read the contents of the appointment label.
[Step 4] Model: Add Remark class
We have to properly encapsulate the appointment in our Person class. Instead of just using a String, let’s follow the conventional class structure that the codebase already uses by adding a Remark class.
Main:
-
Add
Remarkto model component (you can copy fromAddress, remove the regex and change the names accordingly). -
Modify
RemarkCommandto now take in aRemarkinstead of aString.
Tests:
-
Add test for
Remark, to test theRemark#equals()method.
[Step 5] Model: Modify Person to support a Remark field
Now we have the Remark class, we need to actually use it inside Person.
Main:
-
Add
getRemark()inPerson. -
You may assume that the user will not be able to use the
addandeditcommands to modify the remarks field (i.e. the person will be created without a appointment). -
Modify
SampleDataUtilto add remarks for the sample data (delete youraddressBook.xmlso that the application will load the sample data when you launch it.)
[Step 6] Storage: Add Remark field to XmlAdaptedPerson class
We now have Remark s for Person s, but they will be gone when we exit the application. Let’s modify XmlAdaptedPerson to include a Remark field so that it will be saved.
Main:
-
Add a new Xml field for
Remark.
Tests:
-
Fix
invalidAndValidPersonAddressBook.xml,typicalPersonsAddressBook.xml,validAddressBook.xmletc., such that the XML tests will not fail due to a missing<appointment>element.
[Step 6b] Test: Add withRemark() for PersonBuilder
Since Person can now have a Remark, we should add a helper method to PersonBuilder, so that users are able to create remarks when building a Person.
Tests:
-
Add a new method
withRemark()forPersonBuilder. This method will create a newRemarkfor the person that it is currently building. -
Try and use the method on any sample
PersoninTypicalPersons.
[Step 7] Ui: Connect Remark field to PersonCard
Our appointment label in PersonCard is still a placeholder. Let’s bring it to life by binding it with the actual appointment field.
Main:
-
Modify
PersonCard's constructor to bind theRemarkfield to thePerson's appointment.
Tests:
-
Modify
GuiTestAssert#assertCardDisplaysPerson(…)so that it will compare the now-functioning appointment label.
[Step 8] Logic: Implement RemarkCommand#execute() logic
We now have everything set up… but we still can’t modify the remarks. Let’s finish it up by adding in actual logic for our appointment command.
Main:
-
Replace the logic in
RemarkCommand#execute()(that currently just throws anException), with the actual logic to modify the remarks of a person.
Tests:
-
Update
RemarkCommandTestto test that theexecute()logic works.
A.2.3. Full Solution
See this PR for the step-by-step solution.
Appendix B: Product Scope
Target user profile:
-
has a need to manage a significant number of patients
-
prefer desktop apps over other types
-
can type fast
-
prefers typing over mouse input
-
is reasonably comfortable using CLI applications
-
works in the hospital
-
has a need to retrieve patient information promptly
Value proposition: manage contacts faster than a typical mouse/GUI driven application
Appendix C: User Stories
Shown below are the user stories collected and used to conceptualize the features of One Life.
Priorities: High (must have) - * * *, Medium (nice to have) - * *, Low (unlikely to have) - *
| Priority | As a … | I want to … | So that I can… |
|---|---|---|---|
|
user |
be able to create a patient profile |
|
|
user |
add to look up existing patient profiles |
|
|
user |
update existing patient profiles |
|
|
careless user |
delete an existing patient profile |
remove a profile that was accidentally created |
|
new user |
be able to refer to a helplist of commands |
quickly learn how to use the software |
|
expert user |
be able to use shortcuts to access data |
speed up my processes |
|
user |
be able to accurately obtain data of a specific patient when the dataset is large (people of the same name) |
prevent any accidental misdiagnosis |
|
user |
be able to look up a patient based on one or more attributes |
|
|
user |
be able to pin command(s) at the top of my screen |
easily refer to those that I am interested in |
|
user |
be able to hide patient details |
protect the personal details of certain patients |
|
careless user |
be able to undo recent changes or deletion |
recover patients' profiles in the event of a mistake |
|
user |
be able to tag patients with VIP status |
keep track of high profile patients and allocate necessary resources |
|
user |
be able to check if a drug will cause an allergic reaction |
prescribe medication to a patient safely |
|
user |
check if a drug will cause an allergic reaction |
|
|
user |
add a appointment for a patient |
record down anything that doesn’t fall in given categories |
|
user |
check the countries a patient has been to in the last few weeks |
check for any diseases contracted from overseas |
|
user |
group patients by a particular attribute |
|
|
expert user |
be able to use shortcuts for commands (e.g. "d" instead of "delete") |
save time typing long commands |
|
less IT-savvy user |
be able to use more user friendly/natural language commands |
can understand the data entry and retrieval process intuitively |
|
less IT-savvy user |
see the CLI as a chat |
typing in commands will feel more intuitive |
Appendix D: Use Cases
(For all use cases below, the System is the AddressBook and the Actor is the user, unless specified otherwise)
Use case: Display and Schedule data and time of medical appointments
MSS
-
User requests to view all medical appointments or appointments on a specific day.
-
AddressBook shows a list of all appointments.
-
User requests to appointment a patient at a specific date and time.
-
AddressBook updates appointment details in database.
-
AddressBook shows the appointments details to the user.
Use case ends.
Extensions
-
3a. Patient is not in database.
-
3a1. AddressBook warns user that patient is not in database.
Use case resumes at step 1.
-
-
4a. Appointment clashes with another appointment.
-
4a1. AddressBook warns user of appointment clash.
Use case resumes at step 1.
-
Use case: Intuitive Command Prompting
MSS
-
User enters in command that takes in in arguments without any specified arguments. (e.g. add, delete)
-
AddressBook shows instructions to guide user.
-
User responds to instructions with respective answers/inputs.
-
AddressBook performs command for user and echoes changes made to user.
Use case ends.
Extensions
-
1a. User enters unrecognised command.
-
1a1. AddressBook shows error message and shows list of available commands.
Use case resumes at step 1.
-
-
3a. User accidentally enters wrong data when prompted by instruction.
-
3a1. User follows instruction to return to previous instruction/undo. (e.g. type /bk)
Use case resumes at step 3.
-
Use case: Viewing and updating medical history
MSS
-
User requests to view medical history of a particular patient at a specific date.
-
AddressBook displays medical history of the patient.
-
User requests to update medical history.
-
AddressBook updates patient medical history in database using current date.
-
AddressBook displays success message.
Use case ends.
Extensions
-
1a. Patient is not in database.
-
1a1. AddressBook warns user that patient is not in database.
Use case resumes at step 1.
-
-
1b. No specified date.
-
1b1. AddressBook displays most recent medical history.
Use case resumes at step 3.
-
Use case: Add and display doctors' profile
MSS
-
User adds new doctor to the database.
-
Addressbook shows success message.
-
User requests to display all doctors.
-
Addressbook displays all doctors’ information and indicates their current availability.
Use case ends.
Extensions
-
1a. User does not specify the doctor’s medical speciality.
-
1a1. Addressbook prompts user of insufficient information.
Use case resumes at step 1.
-
-
1b. Similar name already exists in the same medical department.
-
1b1. Addressbook prompts user that similar name already exists.
Use case resumes at Step 1.
-
Use case: Displays a specific doctor’s appointment
MSS
-
User requests to view the appointment of a particular doctor.
-
Addressbook displays appointment of the specified doctor. (In ascending chronological order)
Use case ends.
Extensions
-
1a. User inputs wrong/invalid doctor’s name or medical department.
-
1a1. Addressbook informs user that there is no doctor with the name and/or medical department specified by the user.
Use case ends.
-
-
1b. User does not specify doctor’s name.
-
1b1. Addressbook informs use that no doctor was specified.
Use case ends.
-
-
1c. User enters a doctor whose name appears in more than 1 medical department.
-
1c1. Addressbook displays to user that there are more than 1 Dr [name] detected.
-
1c2. Addressbook requests user to re-enter input and indicate the doctor’s medical department as well.
Use case resumes from Step 1.
-
Use case: Find patients by any keywords
MSS
-
User requests to find patients by tag.
-
Addressbook lists all users with that tag.
Use case ends.
Extensions
-
1a. There are no users with that tag.
-
1a1. Addressbook returns an empty list of patients.
Use case resumes at step 1.
-
Appendix E: Non Functional Requirements
-
Should work on any mainstream OS as long as it has Java
9or higher installed. -
Should be able to hold up to 1000 persons without a noticeable sluggishness in performance for typical usage.
-
A user with above average typing speed for regular English text (i.e. not code, not system admin commands) should be able to accomplish most of the tasks faster using commands than using the mouse.
Appendix G: Product Survey
Product Name
Author: …
Pros:
-
…
-
…
Cons:
-
…
-
…
Appendix H: Instructions for Manual Testing
Given below are instructions to test the app manually.
| These instructions only provide a starting point for testers to work on; testers are expected to do more exploratory testing. |
H.1. Launch and shutdown
-
Initial launch
-
Download the jar file and copy into an empty folder.
-
Double-click the jar file.
Expected: Shows the GUI with a set of sample contacts. The window size may not be optimum.
-
-
Saving window preferences
-
Resize the window to an optimum size. Move the window to a different location. Close the window.
-
Re-launch the app by double-clicking the jar file.
Expected: The most recent window size and location is retained.
-
{ more test cases … }
H.2. Deleting a person
-
Deleting a person while all persons are listed
-
Prerequisites: List all persons using the
listcommand. Multiple persons in the list. -
Test case:
delete 1
Expected: First contact is deleted from the list. Details of the deleted contact shown in the status message. Timestamp in the status bar is updated. -
Test case:
delete 0
Expected: No person is deleted. Error details shown in the status message. Status bar remains the same. -
Other incorrect delete commands to try:
delete,delete x(where x is larger than the list size) {give more}
Expected: Similar to previous.
-
{ more test cases … }
H.3. Saving data
-
Dealing with missing/corrupted data files
-
{explain how to simulate a missing/corrupted file and the expected behavior}
-
{ more test cases … }